I am working on a web application, which BackEnd is in NodeJS, FrontEnd is ReactJS Single Page Web Application.
I want to deploy the application on
AWS EC2, Here is how I did it.
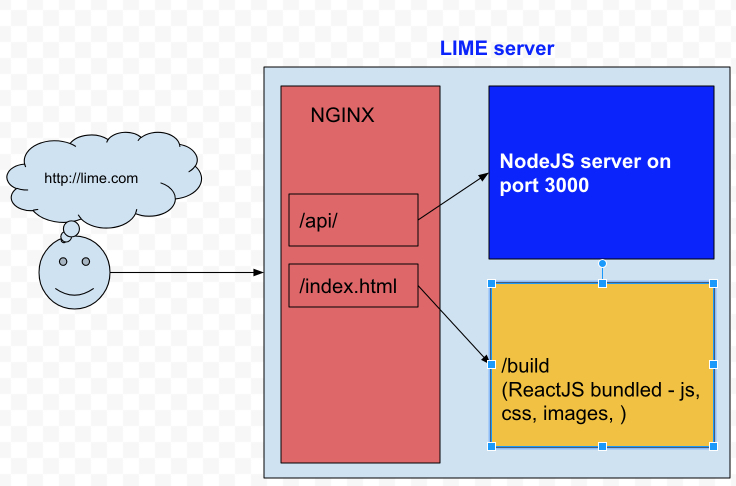 |
| Client - Server overview |
NodeJS
node version : v10.13.0
npm version : 6.4.1
BackEnd application runs on port 3000
ReactJS
R
eact-scripts : 2.1.1 is ReactJS development tool, also help us to bundle javascript, css, images... into a build folder.
NGINX
Version :
nginx version: nginx/1.14.0 (Ubuntu) , to find
ngnix version
Change nginx default file: /etc/nginx/sites-enabled/default
1. Add proxy pass for API
location ~ ^/api/ {
   proxy_pass      http://127.0.0.1:3000;
}
to pass all API requests to NodeJS server.
2. Add root static folder
root /home/ubuntu/public_html/lime-fe/build;
To point default static folder to the build folder of
react-script.
3. Also it is important to have
location / {
    try_files $uri /index.html;
}
4. Reload nginx sever:
# systemctl restart nginx
OR
# sudo systemctl restart nginx
5. Additional setups:
- Remove nginx version
server_tokens off;
- Enable Gzip
        ##
        # Gzip Settings
        ##

        gzip on;
        gzip_disable "msie6";

        # gzip_vary on;
        # gzip_proxied any;
        # gzip_comp_level 6;
        # gzip_buffers 16 8k;
        # gzip_http_version 1.1;
        gzip_types text/plain text/css application/json application/javascript text/xml application/xml application/xml+rss text/javascript;
to let reactJS application handles the routing (URLs) instead of nginx.
Full configuration file.
Setup environment variables
~/.bash_profile
Some variables :
export NODE_ENV=production
To reload bash environment, using the command
source ~/.bash_profile
OR
. ~/.bash_profile
Some notes:
If server setup with production mode on
NODE_ENV=production
, NPM install will ignore devDependencies
We can use npm install --only=dev or set NPM production.
to check if npm is in production mode , we can use the command:
npm config get production
To turn off production mode:
npm config set -g production false
2. pm2 doesn’t reload environment variables:
we need to use
--update-env ,
e.g:
pm2 reload sever --update-env
References
- How to install NodeJS and NPM : https://github.com/nodesource/distributions/blob/master/README.md
- How to install
https://www.digitalocean.com/community/tutorials/how-to-install-nginx-on-ubuntu-16-04
- How to check Ubuntu version: https://askubuntu.com/questions/686239/how-do-i-check-the-version-of-ubuntu-i-am-running
- How to install MongoDB on Ubuntu: https://docs.mongodb.com/v3.2/administration/install-on-linux/