Wednesday, December 5, 2018

How to deploy NodeJS ReactJS to AWS EC2

I am working on a web application, which BackEnd is in NodeJS, FrontEnd is ReactJS Single Page Web Application.

I want to deploy the application on AWS EC2, Here is how I did it.

2018-12-05-00-19-12
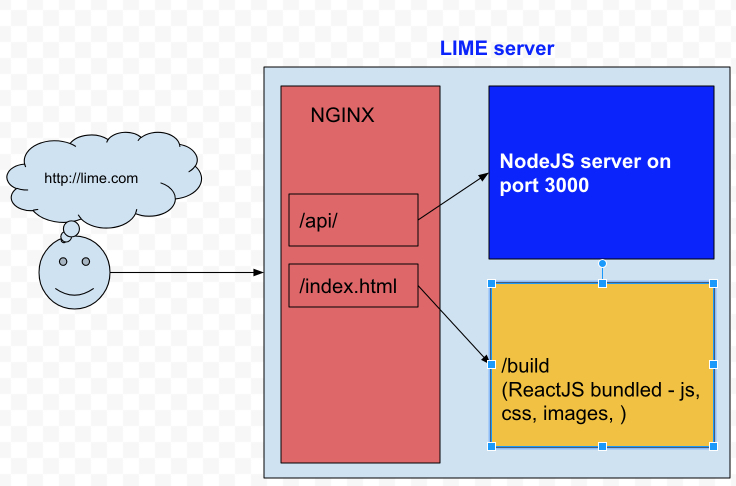
Client - Server overview

 NodeJS

node version : v10.13.0

npm version : 6.4.1

BackEnd application runs on port 3000

I use PM2 for  process manager for Node.Js http://pm2.keymetrics.io/

ReactJS

React-scripts : 2.1.1 is ReactJS development tool, also help us to bundle javascript, css, images... into a build folder.

NGINX

Version : nginx version: nginx/1.14.0 (Ubuntu) , to find ngnix version
Change  nginx default file: /etc/nginx/sites-enabled/default

1. Add proxy pass for API
location ~ ^/api/ {
   proxy_pass      http://127.0.0.1:3000;
}

to pass all API requests to NodeJS server.

2. Add root static folder
root /home/ubuntu/public_html/lime-fe/build;

To point default static folder to the build folder of react-script.

3. Also it is important to have

location / {
    try_files $uri /index.html;
}
4. Reload nginx sever:
 
# systemctl restart nginx
OR
# sudo systemctl restart nginx
5. Additional setups: - Remove nginx version
server_tokens off;
- Enable Gzip
        ##
        # Gzip Settings
        ##

        gzip on;
        gzip_disable "msie6";

        # gzip_vary on;
        # gzip_proxied any;
        # gzip_comp_level 6;
        # gzip_buffers 16 8k;
        # gzip_http_version 1.1;
        gzip_types text/plain text/css application/json application/javascript text/xml application/xml application/xml+rss text/javascript;


to let reactJS application handles the routing (URLs) instead of nginx.

Full configuration file.


Setup environment variables

~/.bash_profile

Some variables :

export NODE_ENV=production

To reload bash environment, using the command

source ~/.bash_profile

OR
. ~/.bash_profile

Some notes:

1. npm install without devDependencies:

If server setup with production mode on

NODE_ENV=production

, NPM install will ignore devDependencies

We can use npm install --only=dev or set NPM production.

to check if npm is in production mode , we can use the command:

npm config get production

To turn off production mode:

npm config set -g production false

2. pm2 doesn’t reload environment variables:

we need to use --update-env ,
e.g:
 pm2 reload sever --update-env

References

  1. How to install NodeJS and NPM : https://github.com/nodesource/distributions/blob/master/README.md

  2. How to install
    https://www.digitalocean.com/community/tutorials/how-to-install-nginx-on-ubuntu-16-04

  3. How to check Ubuntu version: https://askubuntu.com/questions/686239/how-do-i-check-the-version-of-ubuntu-i-am-running

  4. How to install MongoDB on Ubuntu: https://docs.mongodb.com/v3.2/administration/install-on-linux/

Monday, November 12, 2018

Spring Boot - Modularizing project into modules and re-use

While working with microservices, there will be many small modules in your systems, they calls each others, for me it would be great if we can share at least the data transfer classes. It will save time on development

Here is the structure of my example

rest-module-example

In the example, I created a rest-module-example module, it is the main module which separated into 2 modules ( dto.jar and app.jar )

The rest-module-consumer-example will include the dto.jar ( by Maven or Gradle ) , so It will be easy to consume the REST API

You can find details implementation in the repos below:

rest-module-example: https://github.com/vanduc1102/spring-boot-examples/tree/master/module-rest-example

rest-module-consumer-example: https://github.com/vanduc1102/spring-boot-examples/tree/master/module-rest-consumer-example

Monday, November 5, 2018

Spring Boot override Bootstrap properties

1. Bootstrap properties file is inside the packaged jar


This is not a useful case to manage the bootstrap properties or application properties, the reason is you have to rebuild your application again if made any change to the properties

You should have properties file name following the format bootstrap-{profile}.yml ( or .properties variants)


2. Bootstrap properties is outside of the packaged jar.


I prefer this case to manage properties, we don’t need to rebuild the application again if we made change to properties also we can manage our properties better with VCS like git.

Let assume that we have a configuration file outside of packaged jar.

In order to load the file, we need to change the bootstrap properties location by override the spring.cloud.bootstrap.location attribute.


With this approach we can easily override the bootstrap properties.

Wednesday, October 24, 2018

Spring Boot Sleuth and ZipKin

This post is my implementation of the post here: https://reflectoring.io/tracing-with-spring-cloud-sleuth/


Although the post already included the source code, but it is still pretty hard for me to start


So I created this post to help me to remember how to make Slueth and Zipkin work.


Spring Cloud Sleuth


will add traceId and spanId to logger
<dependency>
<groupId>org.springframework.cloud</groupId>
<artifactId>spring-cloud-starter-sleuth</artifactId>
<version>${spring-cloud.version}</version>
</dependency>

Analyze Traces with ZipKin


Logger collector and analytics
<dependency>
<groupId>org.springframework.cloud</groupId>
<artifactId>spring-cloud-starter-zipkin</artifactId>
<version>${spring-cloud.version}</version>
</dependency>

spring.sleuth.sampler.percentage=1.0


Is percentage of sampler, the default value is 0.1 ( 10%) that means you only take 10% of request to sampler


Change to 1.0 ( 100% ) to sample all of request.


Repo URL: https://github.com/vanduc1102/tutorials/tree/master/spring-sleuth


Monday, October 8, 2018

Spring Boot 2 - REST template project

Recently, I have a chance to work with Spring Boot, it was pretty hard for me to create Spring project without template that is ready for development. So I created a template to help me save time for next projects.

What are included in this boilerplate:

Github Repo: https://github.com/vanduc1102/spring-boot-examples/tree/master/spring-boot-2-rest-service-basic

Sunday, August 5, 2018

Install Eclipse Window

Before start install Eclipse, you should check if your PC had installed Java(JDK) here : https://aduckdev.wordpress.com/2018/08/04/how-to-install-jdk-and-setup-java_home-in-windows-10/


Download Eclipse

Open: http://www.eclipse.org/downloads/download.php


Open the downloaded file to start installation:

Screenshot_1


Choose IDE for Java Developer:

Screenshot_2

Choose a folder for installation, we will use default value here.

Screenshot_3

Click Next to install, after the installation finished, click Launch to launch Eclipse

launch

Choose workspace folder. You can use the default also.

Screenshot_4

And here is your Eclipse.

Screenshot_5


How to setup ANDROID_HOME

In order to setup ANDROID_HOME, you need to have Android SDK installed on your PC

Checkout this link: https://developer.android.com/studio/ you can find both Android Studio and Android SDK

Screenshot_5.png

What is Android SDK: it is a bundled of command line tools help you to develop an Android application, it is shipped inside Android Studio

This tutorial show you how to setup ANDROID_HOME variable after you installed Android Studio

1.To find location of Android SDK on your PC. Open Android Studio


Open File --> Settings, type SDK and you will see the location of SDK on your PC, here is: C:\Users\DucNGUYEN\AppData\Local\Android\Sdk 

Screenshot_4.png

2. Setup ANDROID_HOME environment


Open Advanced System Settings: hit Window key and type advanced systemScreenshot_1

Choose Environment variable

Screenshot_3

Add the new variable ADROID_HOME:

Screenshot_6.png
Click OK to save variable and exit the Advanced System Settings.

3. Check the variable installed


Open new Command Prompt window and type echo %ANDROID_HOME% to check

Screenshot_7

DONE

Install NodeJS on Windows

Step 1. Download NodeJS


Open: https://nodejs.org/en/download/

Screenshot_18
Download 64bit version

Step 2. Install the downloaded file


Install downloaded msi file

Screenshot_1 
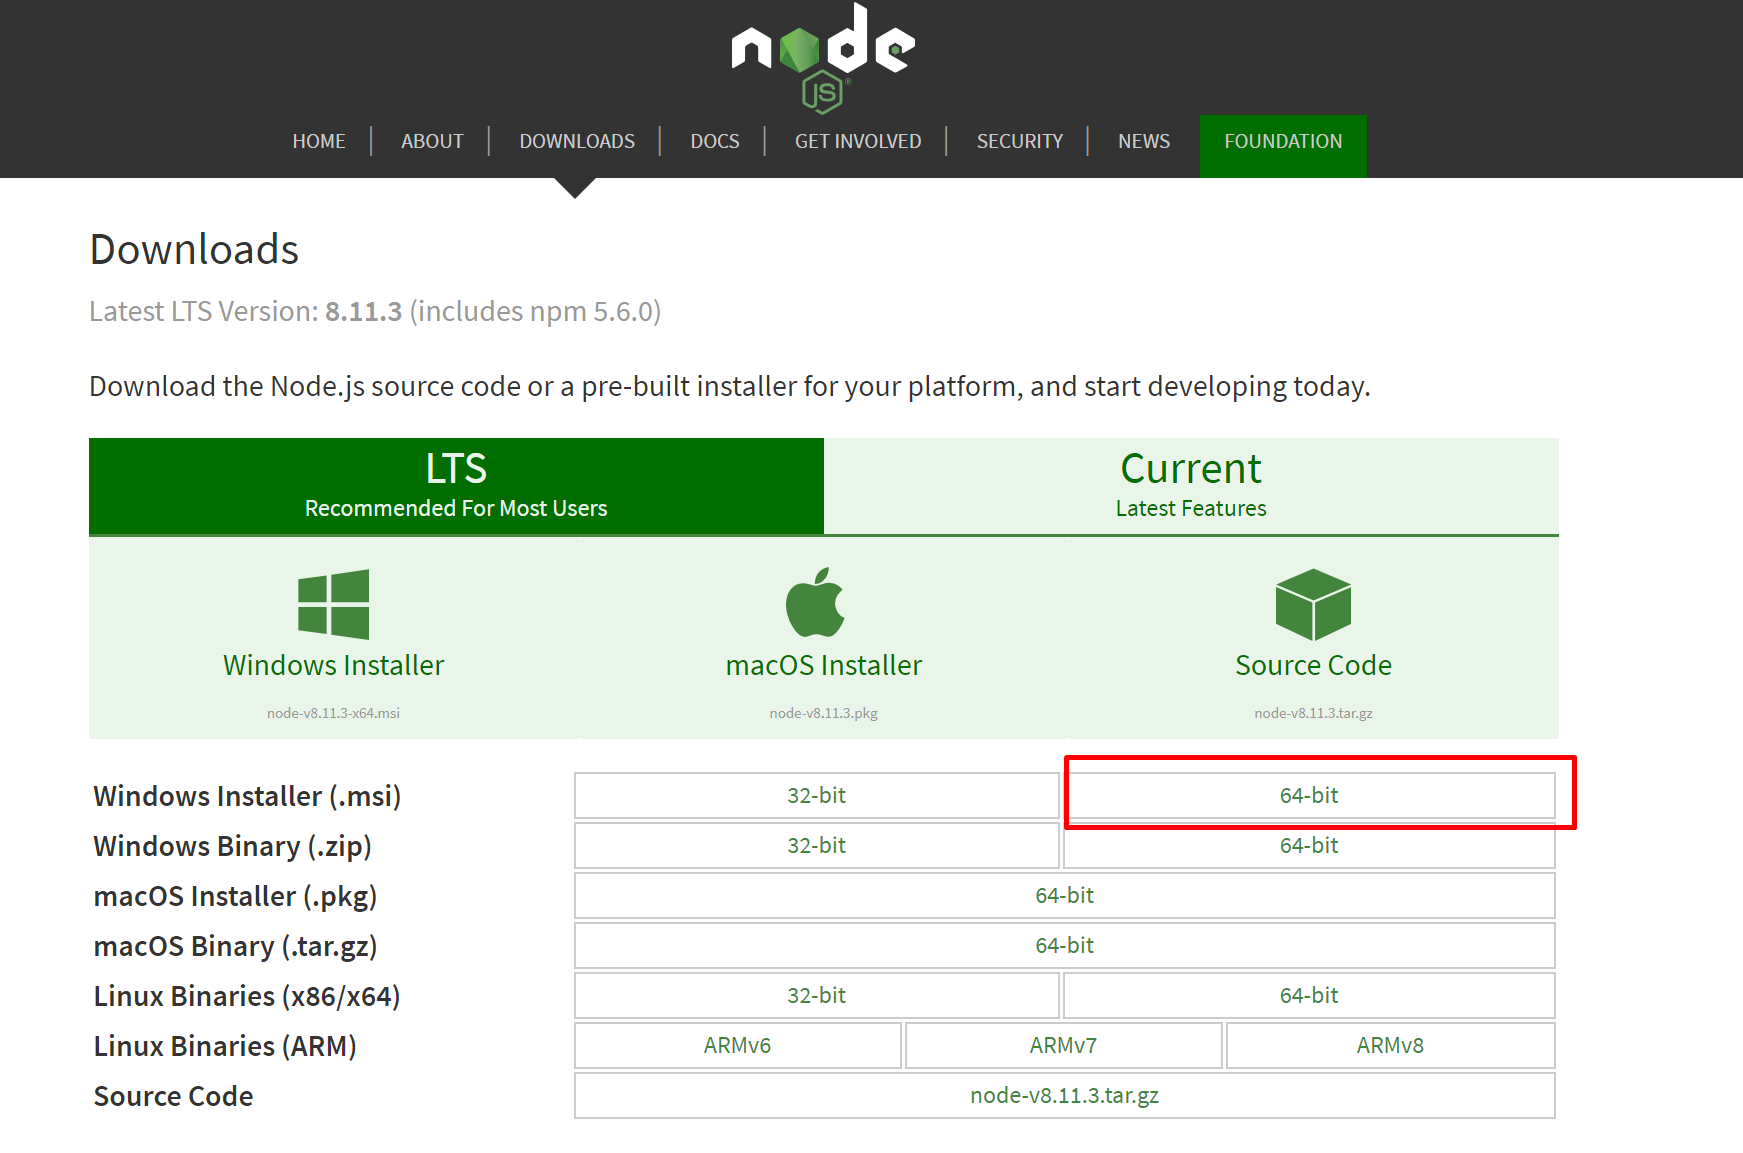
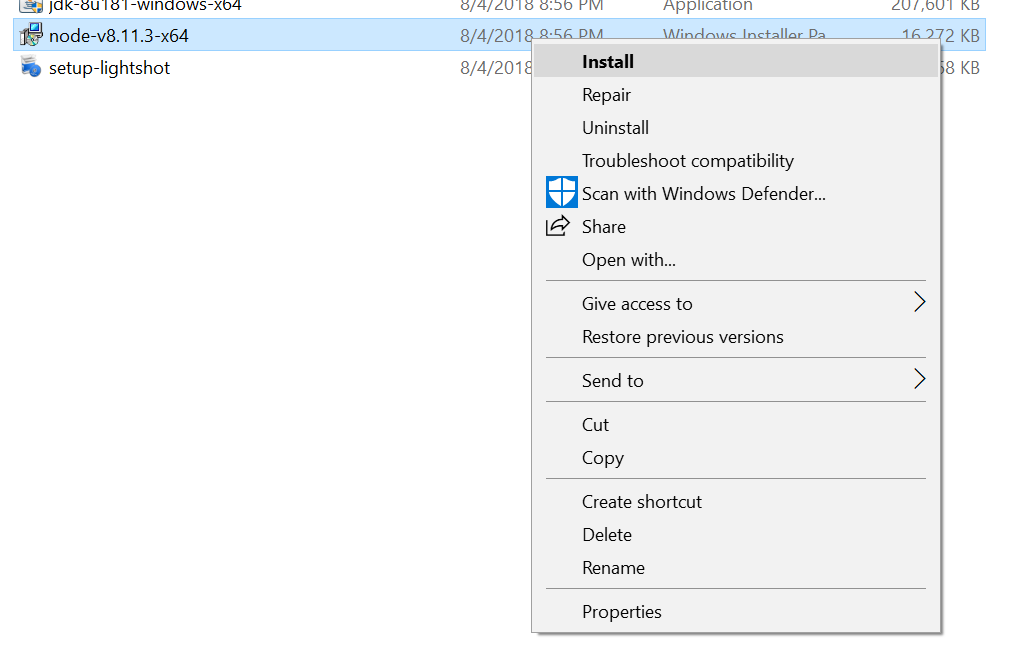
Right click on download msi file[/caption]

Screenshot_2
Click on Next, Next to install as normal application

Screenshot_3
Installation successfully

Step 3. Verify the installation


Screenshot_4
Open Command Prompt to check.

Congratulations

Saturday, August 4, 2018

How to install JDK and setup JAVA_HOME in Windows 10

Step 1. Check if you already installed JDK or JAVA_HOME


Open Command Prompt by hit Window + R keys, type CMD

Screenshot_2
Java and JAVA_HOME were not setup

If you have a screen likes above, you are probably needed to install JDK and setup JAVA_HOME variable

You can also check if you had installed by checking in explore

C:\Program Files\Java 

If you have a screenshot likes below, you can skip Step 2.

[caption id="attachment_200" align="alignnone" width="1298"]Screenshot_7 Installed JDK version 1.8.0.181[/caption]

Step 2.  Install JDK


Open Google and search for "JDK download"

[caption id="attachment_194" align="alignnone" width="1258"]Screenshot_1 
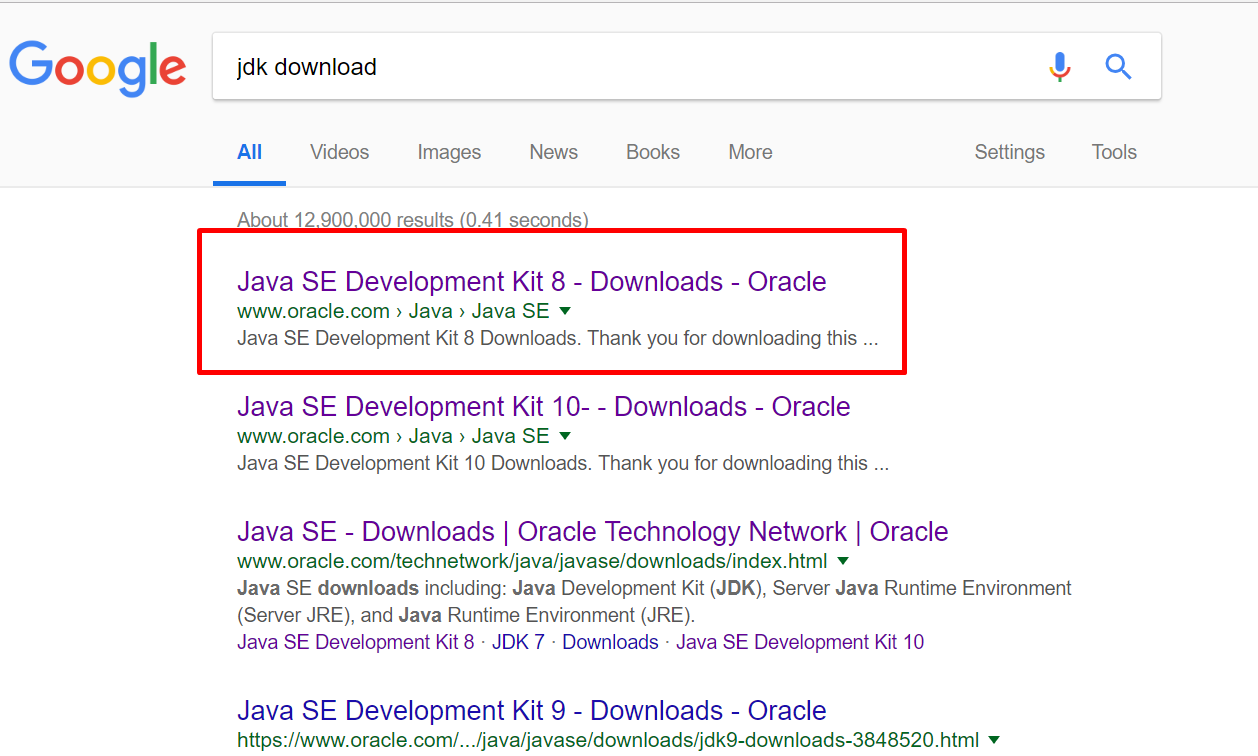
Choose URL with www.oralce.com[/caption]

Download JDK 8 version, it is optional to choose JDK version, at the time of this article JDK 8 is best suitable for development

[caption id="attachment_197" align="alignnone" width="1681"]Screenshot_4 
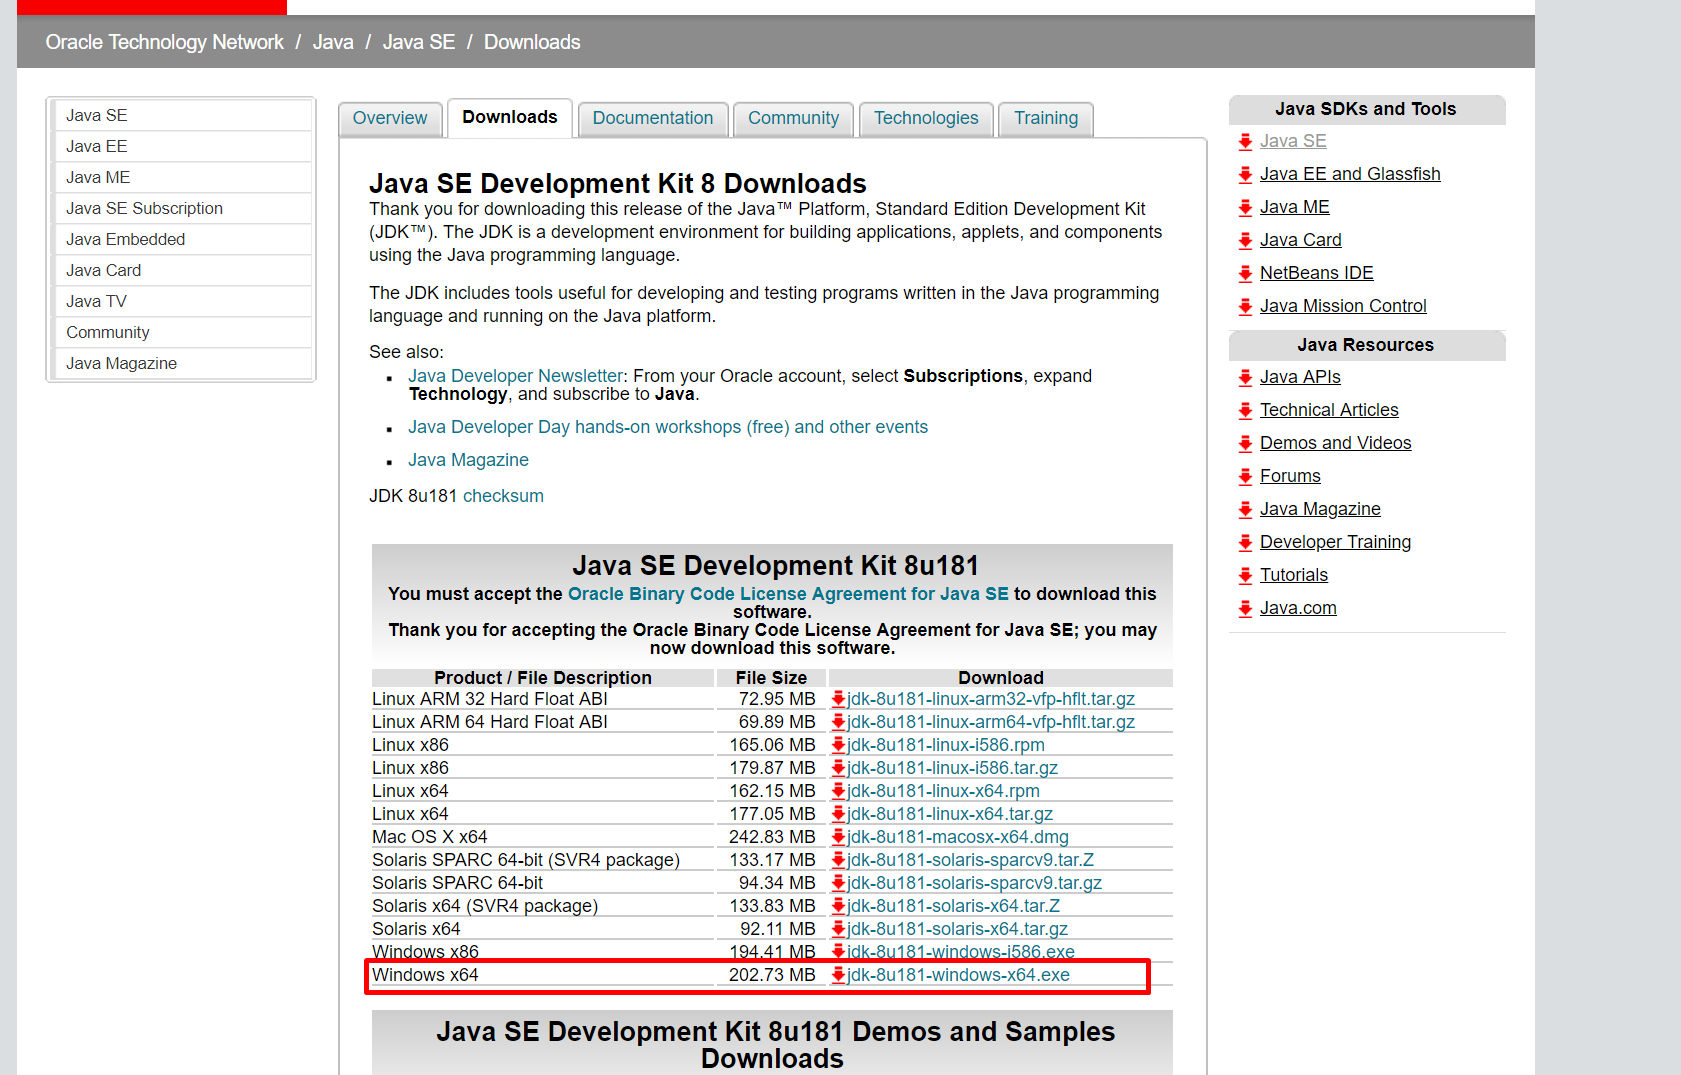
Choose JDK 8[/caption]

Install by click on downloaded JDK

[caption id="attachment_196" align="alignnone" width="1200"]Screenshot_3 
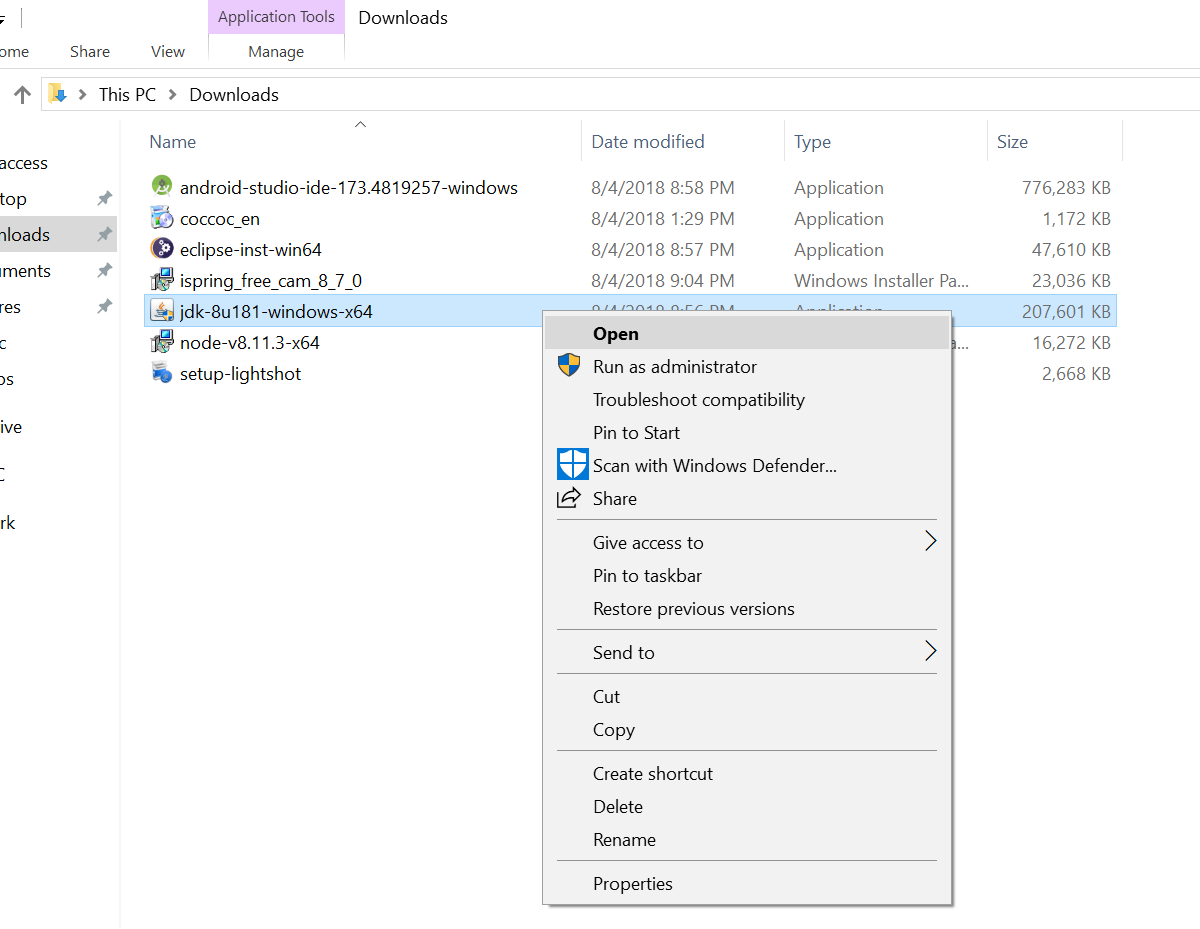
Install the JDK after download finished[/caption]

Noted the location of JDK

[caption id="attachment_198" align="alignnone" width="1103"]Screenshot_5 
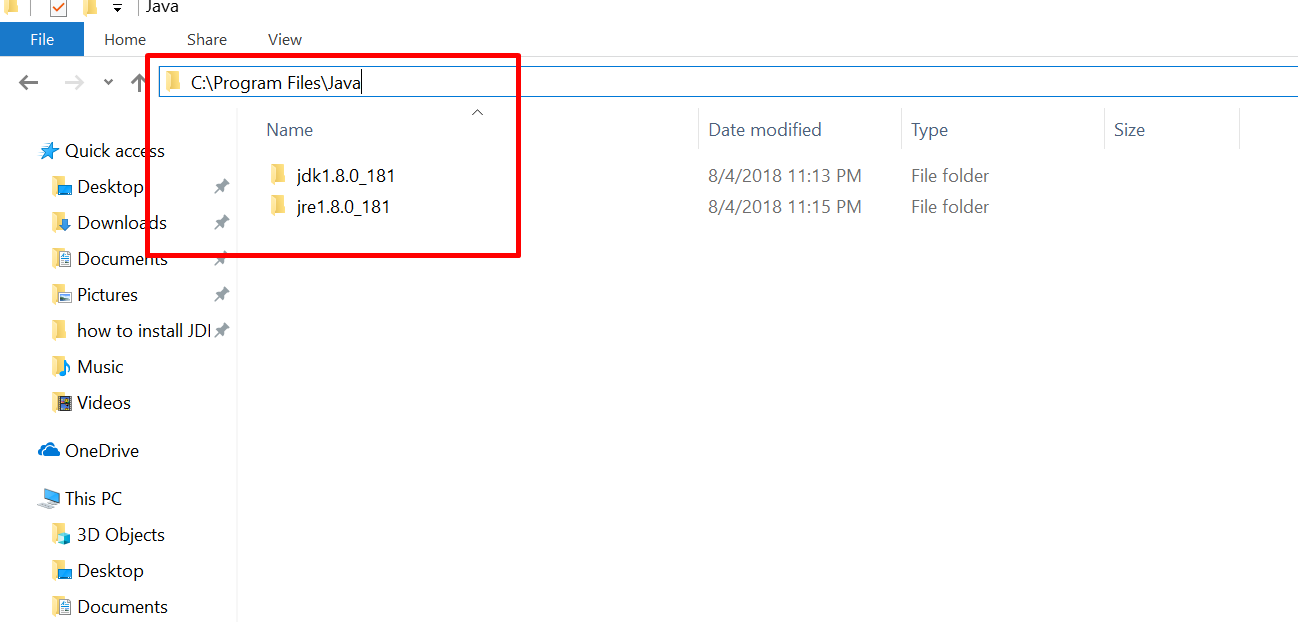
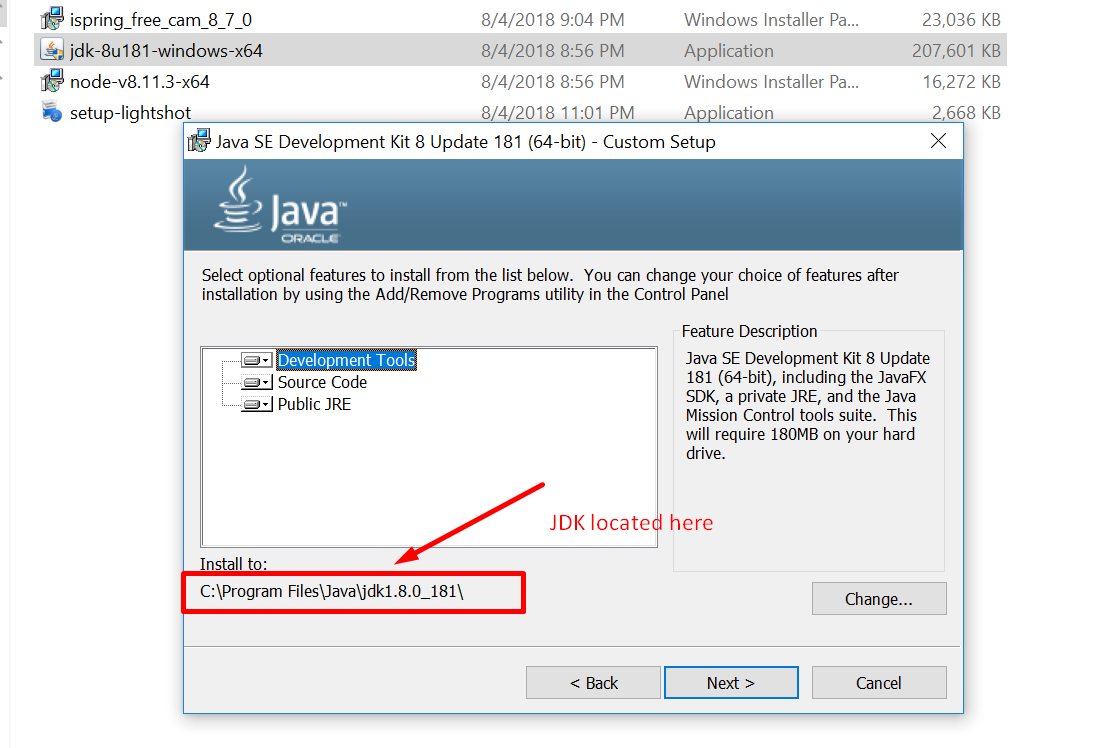
Note the location of JDK[/caption]

It may requires to install JRE, we will install the JRE also.

[caption id="attachment_199" align="alignnone" width="1583"]Screenshot_6 
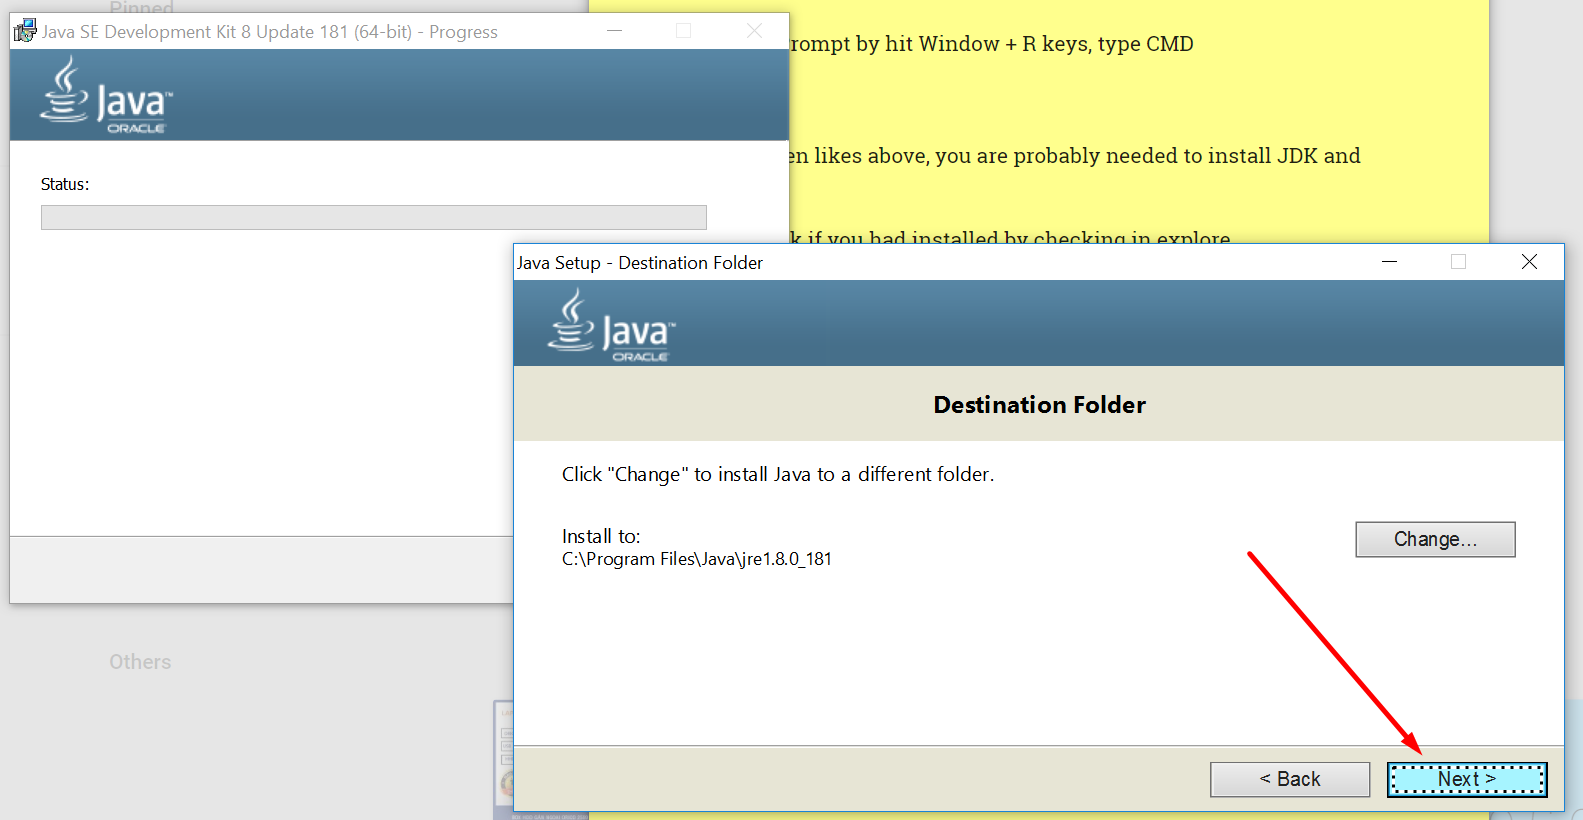
Install JRE also.[/caption]

Installed successfully.

[caption id="attachment_201" align="alignnone" width="832"]Screenshot_8 
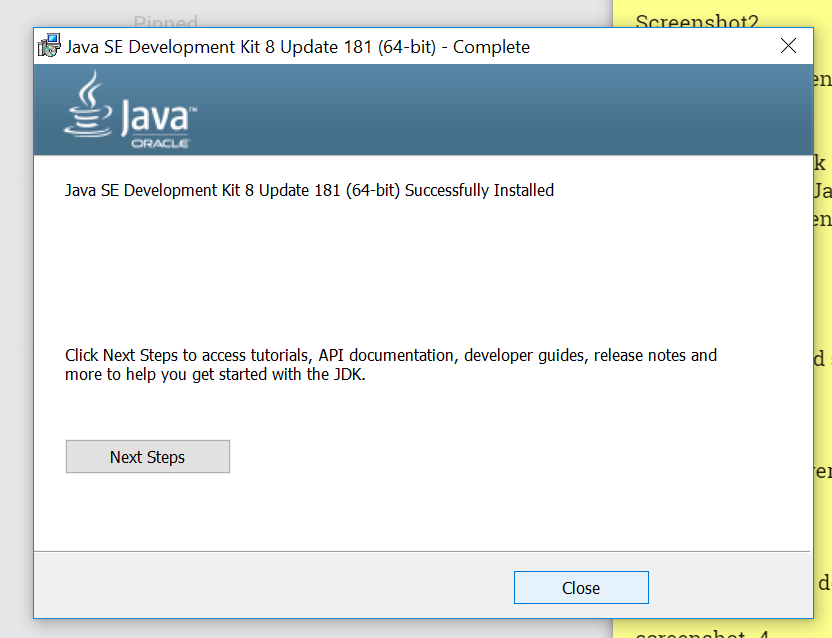
Installed successfully[/caption]

3. Register java and JAVA_HOME to environment variables.


Open Explored, right click on This PC and choose Properties

[caption id="attachment_202" align="alignnone" width="740"]Screenshot_9 
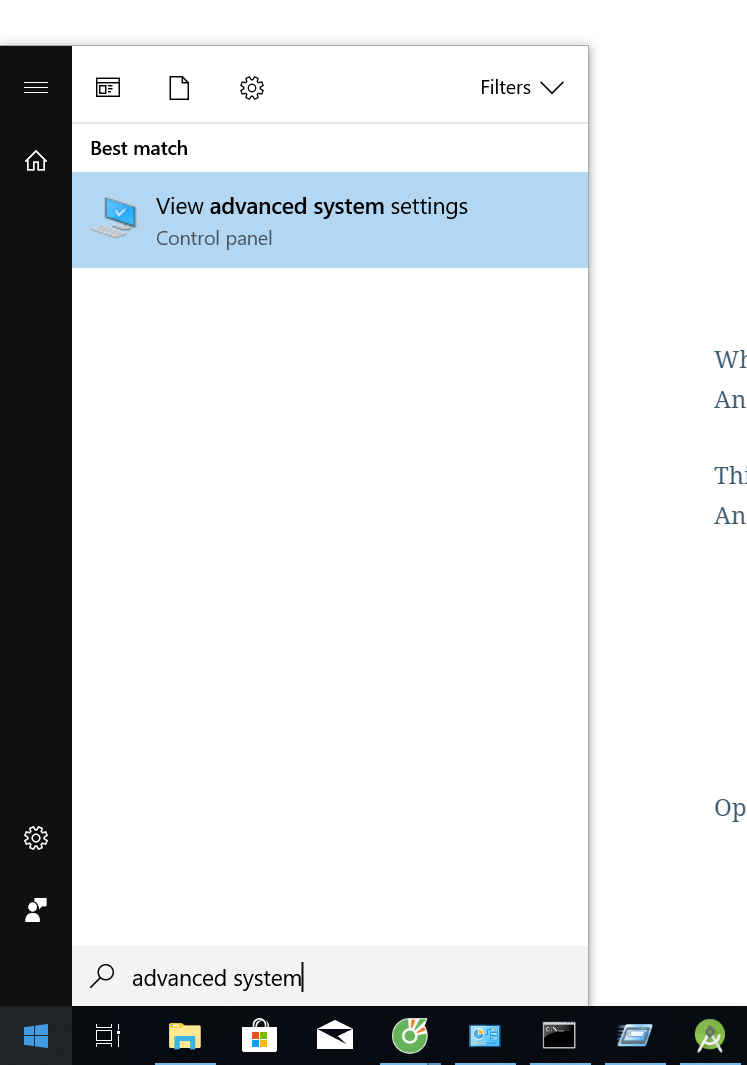
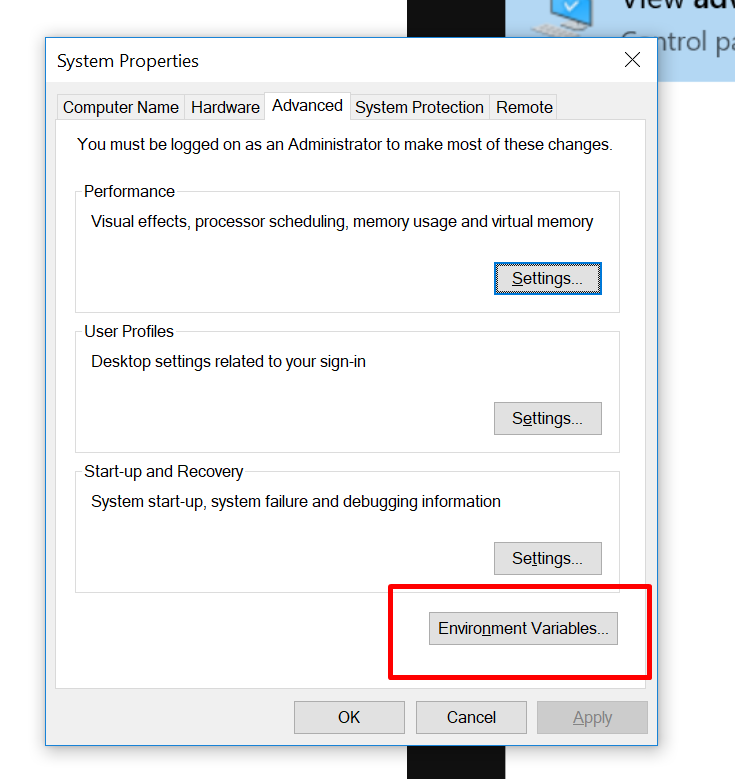
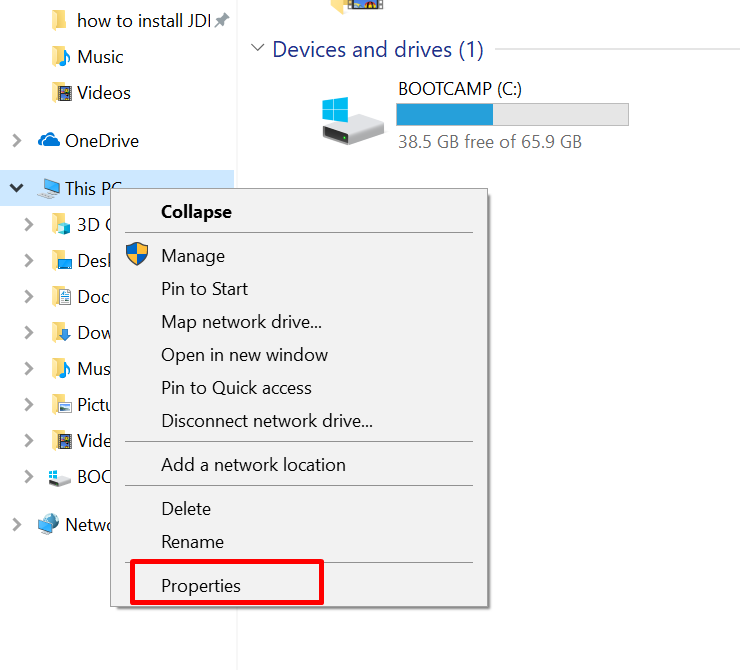
This PC --> Properties[/caption]

Choose Advance system sttings:

[caption id="attachment_203" align="alignnone" width="1473"]Screenshot_10 
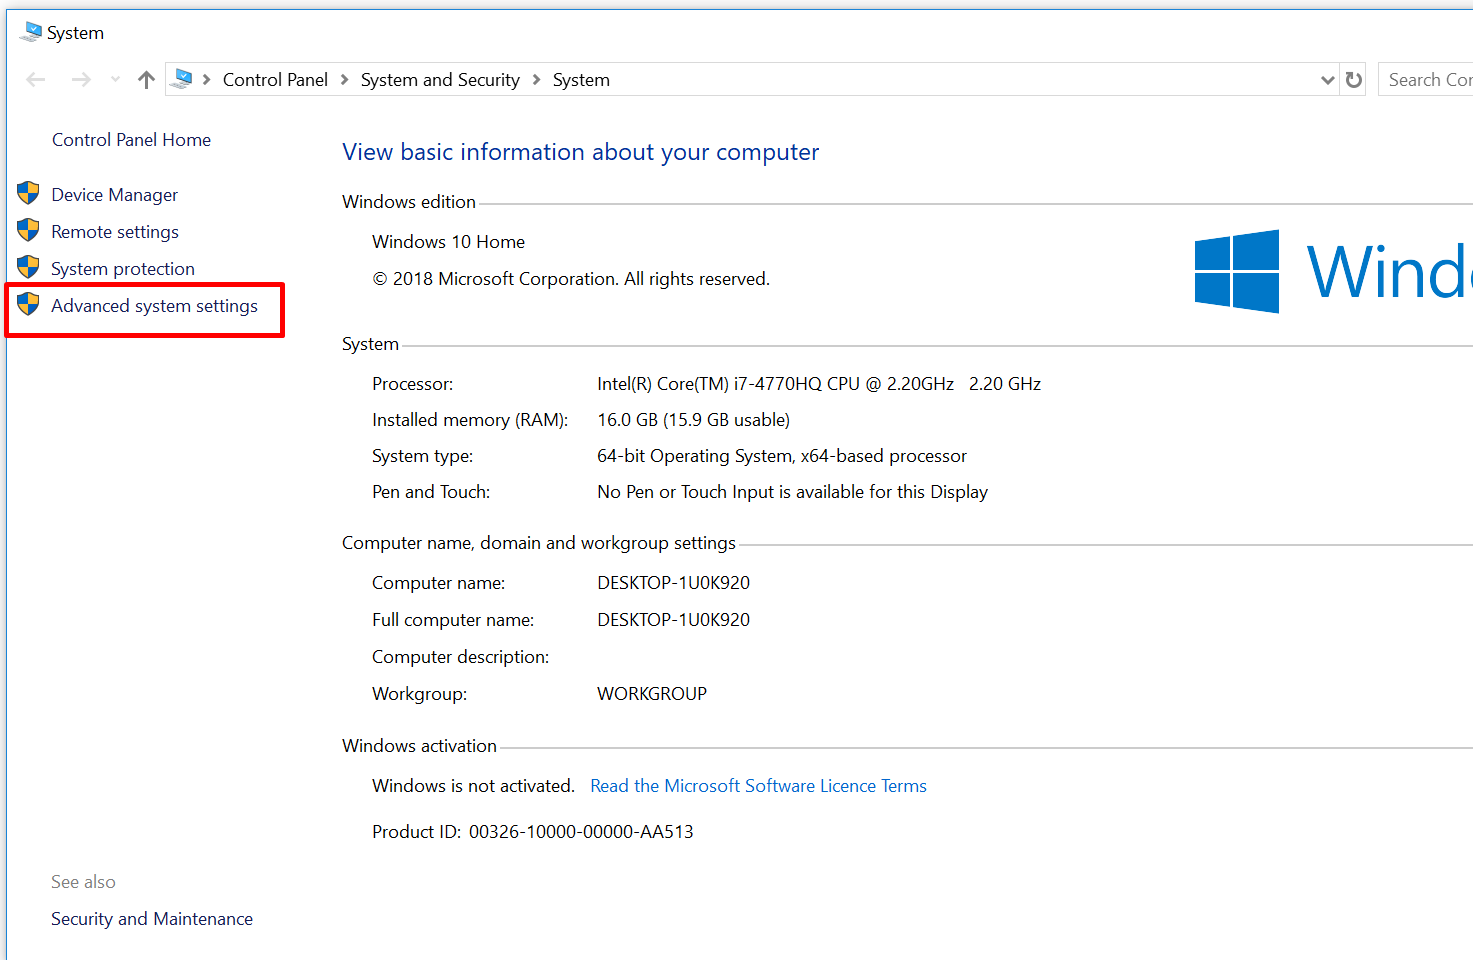
Advanced system settings[/caption]

Choose Environment Variables

Screenshot_11

Now create new variable -

Screenshot_12

Add the JAVA_HOME variable with the value is JDK location in Step 2- C:\Program Files\Java\jdk1.8.0_181

[caption id="attachment_206" align="alignnone" width="1098"]Screenshot_13 
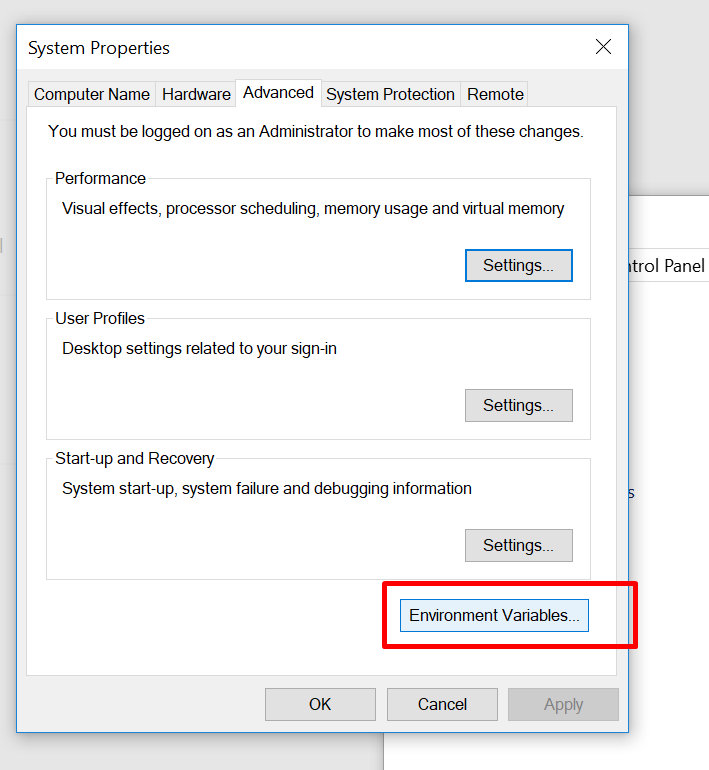
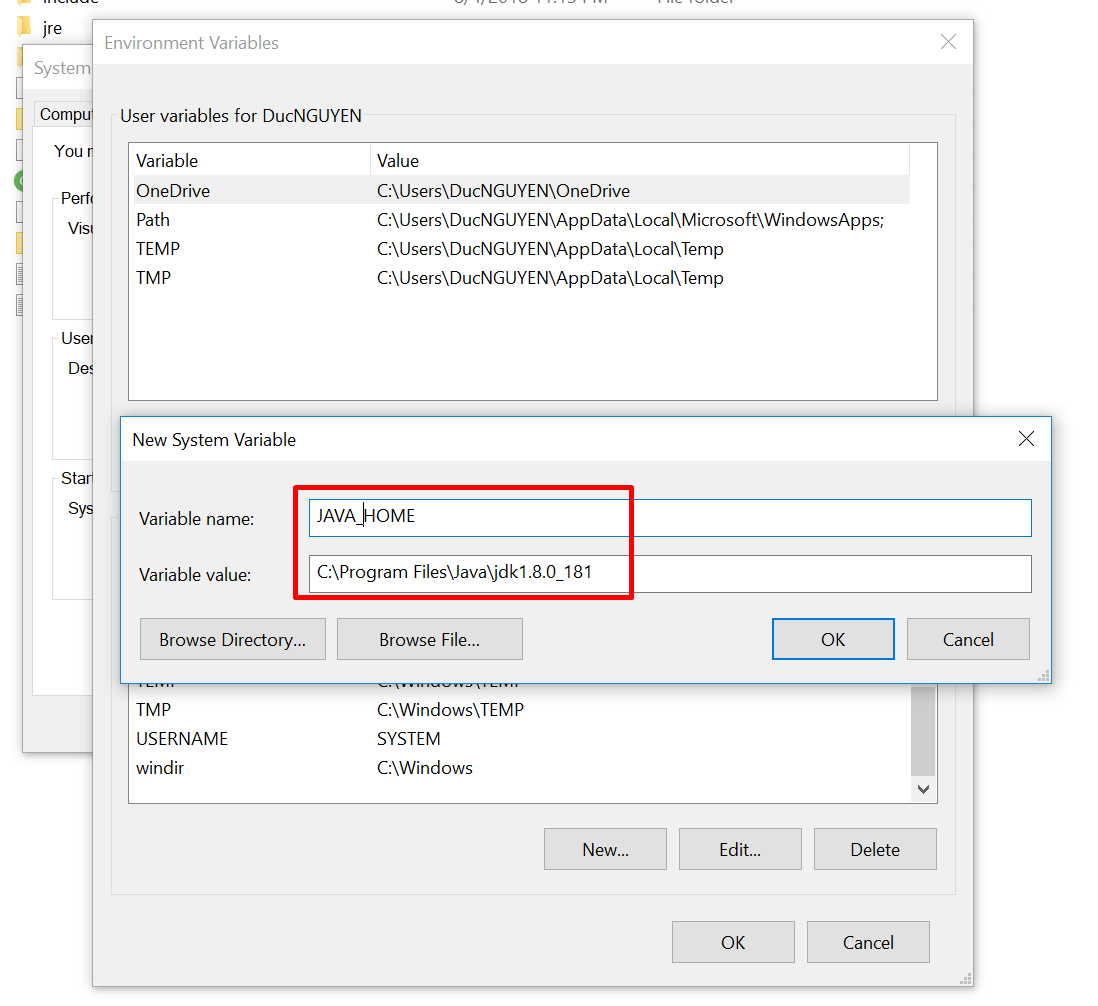
Click OK to save the value[/caption]

Edit PATH variable to add java to PATH

Screenshot_14 
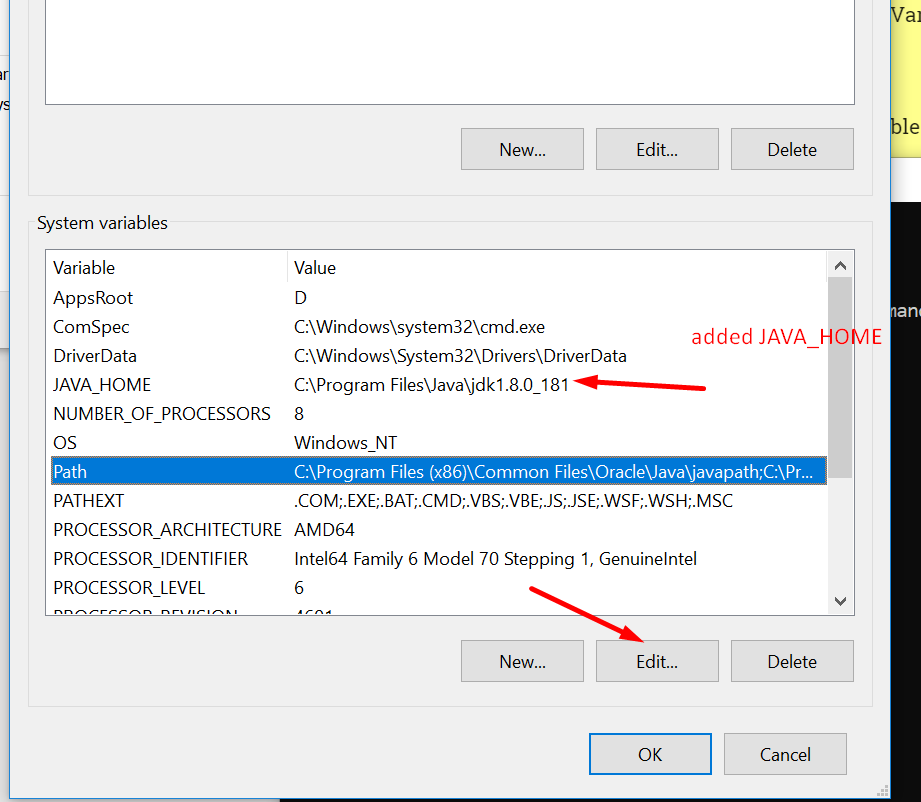
Choose Path and click Edit[/caption]

The screen depends on Window version, if you are in Window 10, You will have screen like below

Screenshot_15 
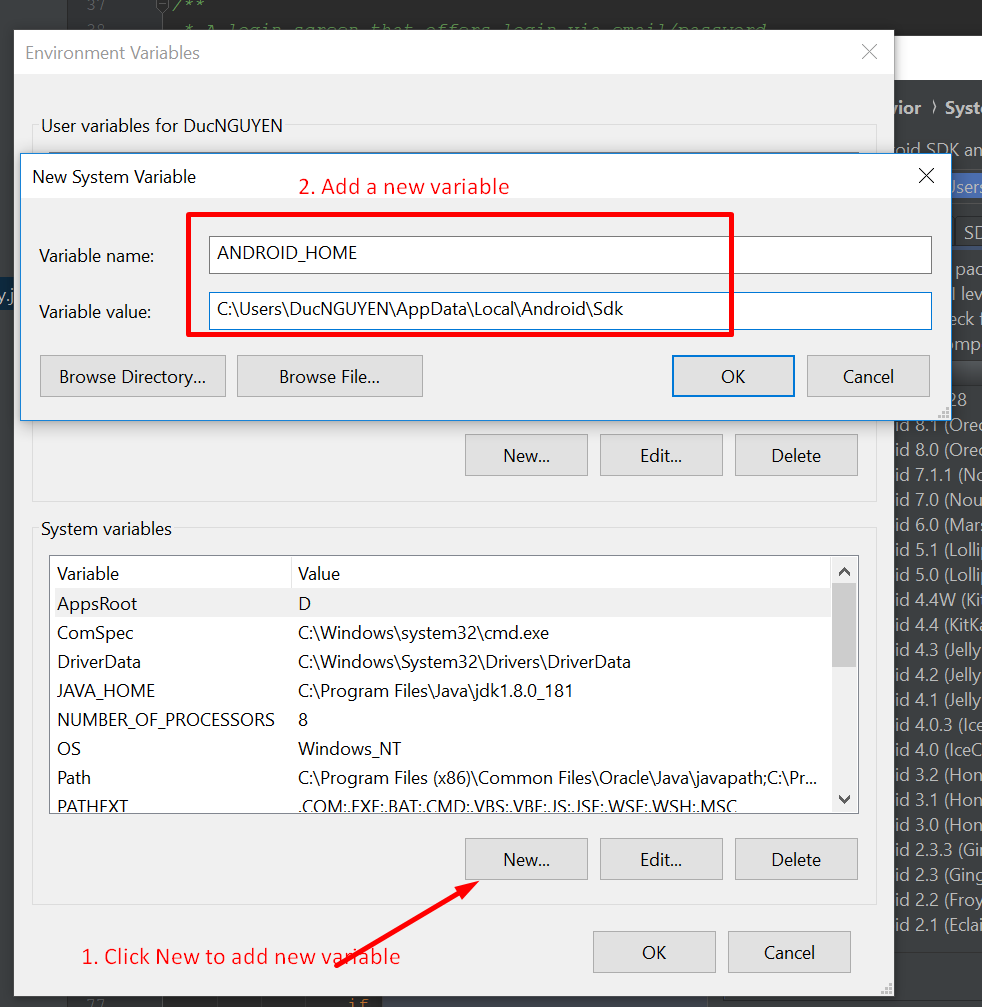
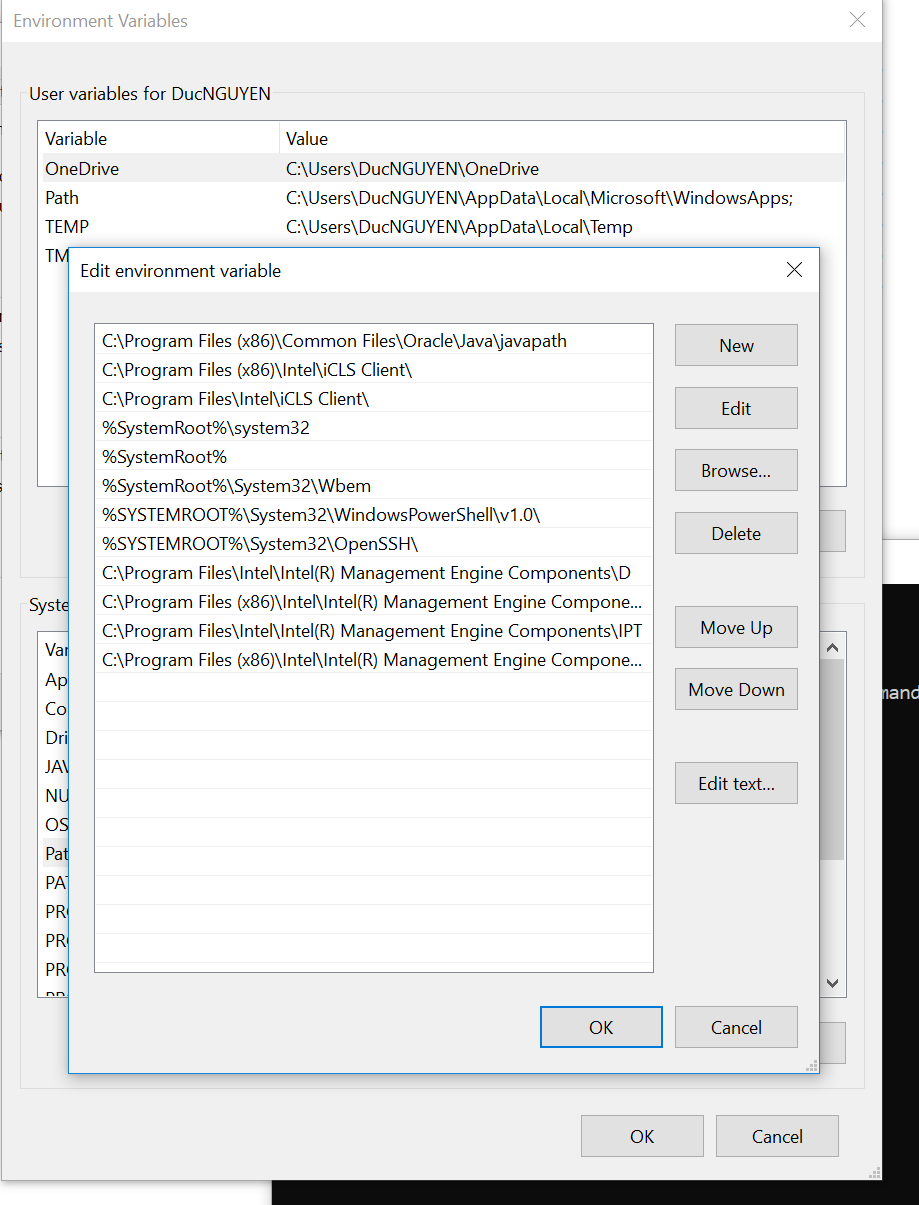
Click on New to add new Variable[/caption]
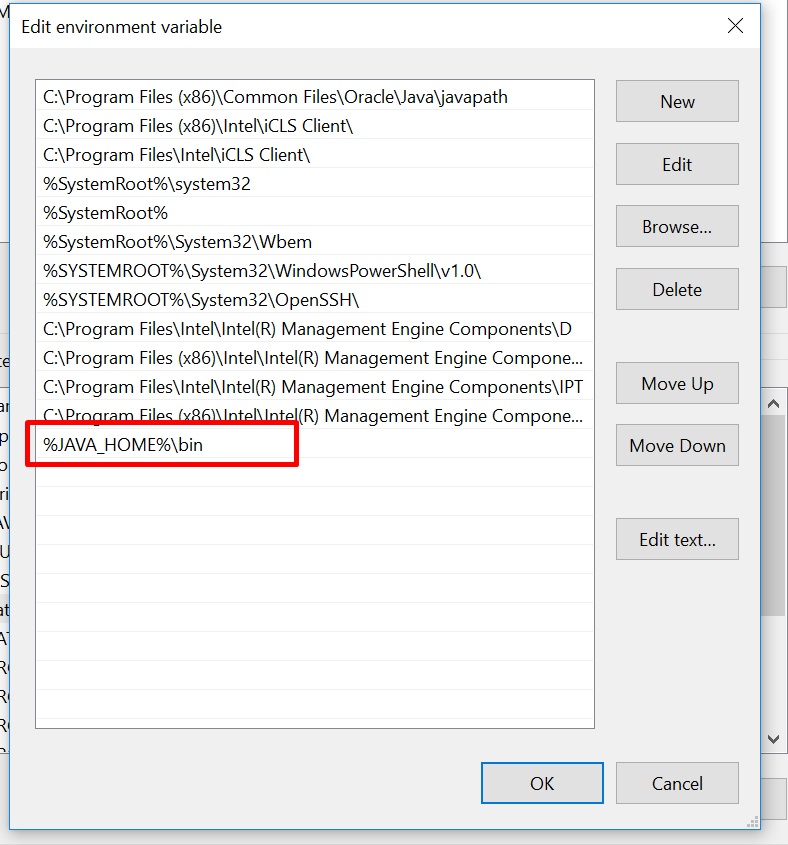
Click on new to add new value

Screenshot_16
Click OK to save the value

Now save all the value by hit OK util we exist the Advance system testing screen.

4. Test the result


You should open a new Command Prompt to test the result

Hit Window + R , type CMD and hit Enter

type javac -version and echo %JAVA_HOME%

Screenshot_17

DONE.

Monday, June 18, 2018

Cài đặt Elastic IP address cho server EC2 trên AWS

Tại sao lại cần phải dùng đến Elastic IP Address.

Khi bạn tạo một EC2, AWS mặc sẽ cấp cho bạn một địa chỉ IP (Public IP Address), nhưng nếu máy chủ của bạn gặp trục trặc bạn phải stop rồi reboot EC2, trong trường hợp này AWS sẽ gán một địa chỉ Public IP khác cho máy EC2 của bạn.

Mọi việc sẽ không có vấn đề gì, nếu như bạn không trỏ một domain đến địa chỉ Public IP mà AWS đã cung cấp.

Trong trường hợp bạn đã trỏ domain của bạn đến Public IP thì khách hàng của bạn sẽ không truy cập được server của bạn nữa vì Public IP đã đổi đến địa chỉ khác.

Đừng lo lắng, AWS đã cung cấp một giải pháp để khắc phục trường hợp này. Đó là ngay sau khi bạn tạo máy chủ EC2. Hãy tạo gán ngay cho nó một địa chỉ Elastic IP Address.


  1. Bạn chọn vào Instance rồi chọn Manage IP Addresss

1-2018-06-18-16-31-15

2. Chọn vào Allocate an Elastic IP
2-2018-06-18-16-31-37

3. Chọn allocate để tạo 1 địa chỉ mới.

3-2018-06-18-16-32-08

4. Một địa chỉ mới đã được cấp cho bạn.2018-06-18-16-32-21

5. Chọn vào action để gán địa chỉ cho một EC2.

2018-06-18-16-32-35


6. Chọn vào Associate address

2018-06-18-16-32-48

7. Chọn Instance ( Máy chủ EC2 đã được tạo)2018-06-18-16-33-20

8. Quay lại máy chủ EC2 và kiểm tra lại địa chỉ IP2018-06-18-16-34-49


Và bây giờ bạn có thể Stop hoặc Reboot server EC2 thoải mái.

Monday, April 23, 2018

Hiểu về Module trong ES6

Bài viết được dịch từ : https://www.sitepoint.com/understanding-es6-modules/

Bài viết này tìm hiểu về module của ES6, cách chúng đang được sử dụng ngày nay với sự trợ giúp của trình chuyển đổi(transpiler).
Hầu như mọi ngôn ngữ đều có khái niệm về các module - một cách để bọc các function được khai báo trong một file khác. Thông thường, một developer tạo ra một thư viện mã hóa đóng gói chịu trách nhiệm xử lý các nhiệm vụ liên quan. Thư viện đó có thể được tham chiếu bởi các ứng dụng hoặc các module khác.

Những lợi ích:

  1. Code thể được chia thành các file nhỏ hơn với những chức năng độc lập.

  2. Các module tương tự có thể được chia sẻ trong rất nhiều ứng dụng khác nhau.

  3. Lý tưởng nhất, các module không bao giờ được kiểm tra bởi một nhà phát triển khác, bởi vì chúng đã được chứng minh là hoạt động.

  4. Code đã chiếu một module được hiểu rằng đó là sự phụ thuộc. Nếu tập tin module được thay đổi hoặc di chuyển, sẽ xảy ra vấn đề ngay lập tức.

  5. Code module (thường) giúp xóa bỏ xung đột đặt tên. Function x () trong module1 không thể đụng độ với function x () trong module2. Các tùy chọn như namespace được sử dụng , và ta sẽ có module1.x ()module2.x ().

Vậy các module trong JavaScript ở đâu?


Bất cứ ai bắt đầu phát triển Web một vài năm trước đây sẽ bị sốc khi phát hiện ra không có khái niệm về các module trong JavaScript. Không thể trực tiếp tham chiếu (reference) hoặc bao gồm (include) một file JavaScript trong một file Javascript khác. Do đó, các developer đã sử dụng các tùy chọn thay thế.

Nhiều thẻ <script> HTML


HTML có thể tải bất kỳ tệp JavaScript số nào bằng cách sử dụng nhiều thẻ <script>:


Trung bình trong năm 2018 một trang web sử dụng 25 tập lệnh riêng biệt, nhưng đó không phải là giải pháp tối ưu:

  • Mỗi tập lệnh khởi tạo một yêu cầu HTTP mới, ảnh hưởng đến hiệu suất trang. HTTP/2 làm giảm bớt vấn đề ở một mức độ nào đó, nhưng nó không giúp các tập lệnh được tham chiếu trên các tên miền khác như CDN.

  • Mỗi tập lệnh tạm dừng xử lý thêm trong khi tập lệnh chạy.

  • Quản lý phụ thuộc (dependencies) là một quy trình thủ công. Trong đoạn mã trên, nếu lib1.js tham chiếu mã trong lib2.js, mã sẽ thất bại vì nó chưa được tải. Điều đó có thể phá vỡ quá trình thực thi của JavaScript.

  • Chức năng có thể ghi đè lên những người khác trừ khi những mô hình module( module patterns) thích hợp được sử dụng. Ban đầu các thư viện JavaScript nổi tiếng hay sử dụng các tên hàm toàn cục hoặc ghi đè các phương thức nguyên gốc.

Nối các file script lại ( Script Concatenation )


Một giải pháp cho các vấn đề của nhiều thẻ <script> là ghép tất cả các tệp JavaScript vào một tệp lớn duy nhất. Điều này giải quyết một số vấn đề về hiệu suất và quản lý phụ thuộc, nhưng nó có thể phải qua một bước xây dựng và thử nghiệm thủ công.

Trình tải module (Module Loaders)


Các hệ thống như RequireJSSystemJS cung cấp một thư viện để tải và đặt tên các thư viện JavaScript khác khi chạy. Các module được tải bằng cách sử dụng các hàm của Ajax khi được yêu cầu. Các hệ thống trợ giúp, nhưng có thể trở nên phức tạp đối với các cơ sở mã lớn hơn hoặc các trang web thêm các thẻ <script> chuẩn vào hỗn hợp.

Module Bundlers, Preprocessors và Transpilers


Bundlers (trình đóng gói) giới thiệu một cách để biên dịch mã JavaScript được tạo ra tại quá trình built. Mã được xử lý để đóng gói các thư viện và tạo ra một tệp ghép nối tương thích với trình duyệt của ES5. Các tùy chọn phổ biến bao gồm Babel, Browserify, webpack và các trình chạy tác vụ phổ biến hơn như GruntGulp.

Quá trình tạo ra một file JavaScript đòi hỏi một số nỗ lực, nhưng có những lợi ích:

  • Quá trình xử lý được tự động hóa do đó ít có khả năng xảy ra lỗi của con người hơn.

  • Xử lý thêm có thể linter( kiểm tra chính tả và ngữ pháp), gỡ bỏ các lệnh gỡ lỗi ( debugger), rút ​​gọn tệp kết quả, v.v.

  • Transpiling cho phép bạn sử dụng các cú pháp thay thế như TypeScript hoặc CoffeeScript.

Module ES6


Các tùy chọn ở trên giới thiệu một loạt các định dạng định nghĩa module cạnh tranh. Cú pháp được chấp nhận rộng rãi bao gồm:

  • CommonJS - module.exports và required được sử dụng trong Node.js

  • Định nghĩa module bất đồng bộ (AMD).

  • Định nghĩa module toàn cục (UMD).

Vì thế, một tiêu chuẩn về module được hỗ trợ mặc định trong ES6 (ES2015) đã được đề xuất.

Mọi thứ bên trong module ES6 đều được đặt ở chế độ riêng tư theo mặc định và chạy ở chế độ nghiêm ngặt (không cần sử dụng 'use restrict'). Các biến, hàm và lớp công muốn được công khai phải sử dụng từ khóa export.

Ví dụ:


Một ví dụ khác chỉ sử dụng một từ khóa export  duy nhất:


Import sẽ được sử dụng để load những thành phần từ file khác vào.


Trong trường hợp này, lib.js nằm trong cùng thư mục với main.js. Tham chiếu tệp tuyệt đối (bắt đầu bằng /), các tham chiếu tệp tương đối (bắt đầu ./ hoặc ../) hoặc URL đầy đủ có thể được sử dụng.

Nhiều thành phần có thể được import vào cùng một lúc:


import có thể được bí danh (allias) để giải quyết vấn đề trùng tên:


Cuối cùng, tất cả các thành phần công khai có thể được import bằng cách cung cấp một không gian tên:


Sử dụng ES6 Modules trên những trình duyệt


Tại thời điểm viết bài, ES6 đã hỗ trợ module trên các trình duyệt dựa trên Chromium (v63 +), Safari 11+ và Edge 16+.Firefox sẽ hỗ trợ mặc định từ phiên bản 60 (phải bật nó lên bằng mở about:config đối với các phiên bản v58 +).

Các tập lệnh sử dụng mô-đun phải được tải bằng cách đặt thuộc tính type = "module" trong thẻ <script>. Ví dụ:


Hoặc inline script


Module được phân tích cú pháp (parse) một lần, bất kể số lần chúng được tham chiếu trong trang hoặc các mô-đun khác.

Những vấn đề có thể gặp với server


module phải được phân phát bằng application/javascript MIME. Hầu hết các máy chủ sẽ tự động thực hiện việc này, nhưng hãy cảnh giác với các tập lệnh được tạo động hoặc tệp .mjs (xem phần Node.js bên dưới).

Các thẻ <script> thông thường có thể tìm nạp tập lệnh trên các tên miền khác nhưng các mô-đun được tìm nạp bằng cách sử dụng chia sẻ tài nguyên gốc (CORS). Do đó, các mô-đun trên các miền khác nhau phải đặt tiêu đề HTTP thích hợp, chẳng hạn như Access-Control-Allow-Origin: *.

Cuối cùng, các mô-đun sẽ không gửi cookie hoặc thông tin đăng nhập khác trừ khi thuộc tính crossorigin = "use-credentials" được thêm vào thẻ <script> và phản hồi chứa tiêu đề Access-Control-Allow-Credentials: true.


Sự thực thi mô-đun  đã được hoãn lại

Việc thực thi kịch bản lệnh <script defer> được trì hoãn cho đến khi file được tải và phân tích cú pháp. module - bao gồm cả tập lệnh inline script - trì hoãn theo mặc định. Thí dụ:


Chưa hỗ trợ module


Các trình duyệt không có hỗ trợ module sẽ không chạy tập lệnh type = "module". Một kịch bản dự phòng có thể được cung cấp với một thuộc tính nomodule mà các trình duyệt tương thích module bỏ qua. Ví dụ:


Bạn có nên sử dụng các mô-đun trong trình duyệt không?


Những trình duyệt hỗ trợ đang nhiều dần lên, nhưng có thể hơi sớm để chuyển sang module ES6. Hiện tại, có lẽ tốt hơn nên sử dụng trình đóng gói module để tạo tập lệnh hoạt động ở mọi nơi.

Sử dụng mô-đun ES6 trong Node.js


Khi Node.js được phát hành vào năm 2009, sẽ không để tưởng tượng ra được là nó không có module. CommonJS đã được thông qua, có nghĩa là trình quản lý gói Node, npm, có thể được phát triển. Mức sử dụng tăng theo cấp số nhân từ thời điểm đó.

Một module CommonJS có thể được mã hóa theo cách tương tự với module ES2015. module.exports được sử dụng thay export:


require (thay vì import) được sử dụng để kéo module này vào một tập lệnh hoặc module khác


require có thể được dùng để import tất cả các thành phần công khai:


Vì vậy, các module ES6 dễ thực hiện trong Node.js, phải không? Er, không.

Module ES6 nằm phía sau cờ trong Node.js 9.8.0+ và sẽ không được triển khai đầy đủ cho đến ít nhất là phiên bản 10. Trong khi các module CommonJS và ES6 chia sẻ cú pháp tương tự, chúng hoạt động theo các cách khác nhau cơ bản:

  • Các module ES6 được phân tích cú pháp trước để phân tích thêm các thành phần cần import trước khi mã được thực hiện.

  • Các module CommonJS tải các phụ thuộc theo yêu cầu trong khi thực thi mã.

Nó sẽ không tạo sự khác biệt trong ví dụ trên, nhưng hãy xem xét mã module ES2015 sau:


Thứ tự thực thi có thể quan trọng trong một số ứng dụng, và điều gì sẽ xảy ra nếu các mô đun ES2015 và CommonJS được trộn lẫn trong cùng một tệp? Để giải quyết vấn đề này, Node.js sẽ chỉ cho phép các module ES6 trong các tệp có phần mở rộng .mjs. Các tệp có phần mở rộng .js sẽ mặc định là CommonJS. Đó là một tùy chọn đơn giản, loại bỏ phần lớn sự phức tạp và phải hỗ trợ các trình chỉnh sửa mã và các trình soạn thảo.

Bạn có nên sử dụng module ES6 trong Node.js không?


Module ES6 chỉ thực tế từ Node.js v10 trở đi (được phát hành vào tháng 4 năm 2018). Việc chuyển đổi một dự án hiện có không có khả năng dẫn đến bất kỳ lợi ích nào và sẽ khiến cho một ứng dụng không tương thích với các phiên bản trước của Node.js.

Đối với các dự án mới, các mô đun ES6 cung cấp một thay thế cho CommonJS. Cú pháp giống hệt với mã hóa phía máy khách và có thể cung cấp một tuyến đường dễ dàng hơn cho những ửng dụng được viết bằng JavaScript từ server đến client (isomorphic JavaScript).

Tương lai gần của module


Một hệ thống module JavaScript chuẩn hóa mất nhiều năm để đến hoàn thành, và thậm chí còn lâu hơn để thực hiện, nhưng các vấn đề đã được sửa chữa. Tất cả các trình duyệt chính và Node.js từ giữa năm 2018 đều hỗ trợ các module ES6, mặc dù sự chậm trễ chuyển đổi sẽ được mong đợi trong khi mọi người nâng cấp.

Tìm hiểu các module ES6 sẽ giúp ích cho con đường Javascript Developer của bạn trong tương lai.