Showing posts with label java. Show all posts

Monday, November 12, 2018

Spring Boot - Modularizing project into modules and re-use

While working with microservices, there will be many small modules in your systems, they calls each others, for me it would be great if we can share at least the data transfer classes. It will save time on development

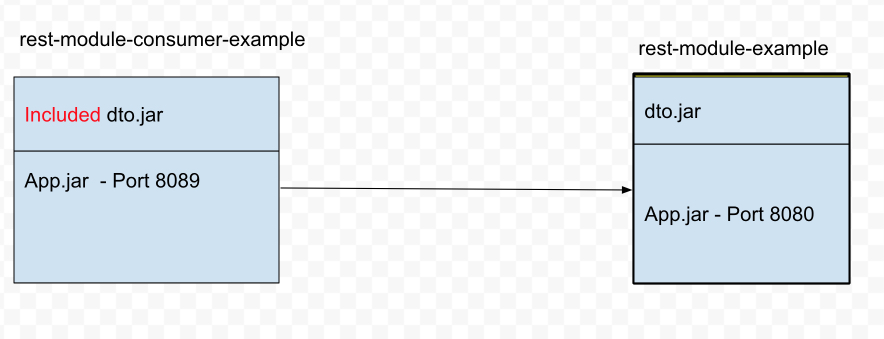
Here is the structure of my example

rest-module-example

In the example, I created a rest-module-example module, it is the main module which separated into 2 modules ( dto.jar and app.jar )

The rest-module-consumer-example will include the dto.jar ( by Maven or Gradle ) , so It will be easy to consume the REST API

You can find details implementation in the repos below:

rest-module-example: https://github.com/vanduc1102/spring-boot-examples/tree/master/module-rest-example

rest-module-consumer-example: https://github.com/vanduc1102/spring-boot-examples/tree/master/module-rest-consumer-example

Monday, November 5, 2018

Spring Boot override Bootstrap properties

1. Bootstrap properties file is inside the packaged jar


This is not a useful case to manage the bootstrap properties or application properties, the reason is you have to rebuild your application again if made any change to the properties

You should have properties file name following the format bootstrap-{profile}.yml ( or .properties variants)


2. Bootstrap properties is outside of the packaged jar.


I prefer this case to manage properties, we don’t need to rebuild the application again if we made change to properties also we can manage our properties better with VCS like git.

Let assume that we have a configuration file outside of packaged jar.

In order to load the file, we need to change the bootstrap properties location by override the spring.cloud.bootstrap.location attribute.


With this approach we can easily override the bootstrap properties.

Wednesday, October 24, 2018

Spring Boot Sleuth and ZipKin

This post is my implementation of the post here: https://reflectoring.io/tracing-with-spring-cloud-sleuth/


Although the post already included the source code, but it is still pretty hard for me to start


So I created this post to help me to remember how to make Slueth and Zipkin work.


Spring Cloud Sleuth


will add traceId and spanId to logger
<dependency>
<groupId>org.springframework.cloud</groupId>
<artifactId>spring-cloud-starter-sleuth</artifactId>
<version>${spring-cloud.version}</version>
</dependency>

Analyze Traces with ZipKin


Logger collector and analytics
<dependency>
<groupId>org.springframework.cloud</groupId>
<artifactId>spring-cloud-starter-zipkin</artifactId>
<version>${spring-cloud.version}</version>
</dependency>

spring.sleuth.sampler.percentage=1.0


Is percentage of sampler, the default value is 0.1 ( 10%) that means you only take 10% of request to sampler


Change to 1.0 ( 100% ) to sample all of request.


Repo URL: https://github.com/vanduc1102/tutorials/tree/master/spring-sleuth


Monday, October 8, 2018

Spring Boot 2 - REST template project

Recently, I have a chance to work with Spring Boot, it was pretty hard for me to create Spring project without template that is ready for development. So I created a template to help me save time for next projects.

What are included in this boilerplate:

Github Repo: https://github.com/vanduc1102/spring-boot-examples/tree/master/spring-boot-2-rest-service-basic

Sunday, August 5, 2018

Install Eclipse Window

Before start install Eclipse, you should check if your PC had installed Java(JDK) here : https://aduckdev.wordpress.com/2018/08/04/how-to-install-jdk-and-setup-java_home-in-windows-10/


Download Eclipse

Open: http://www.eclipse.org/downloads/download.php


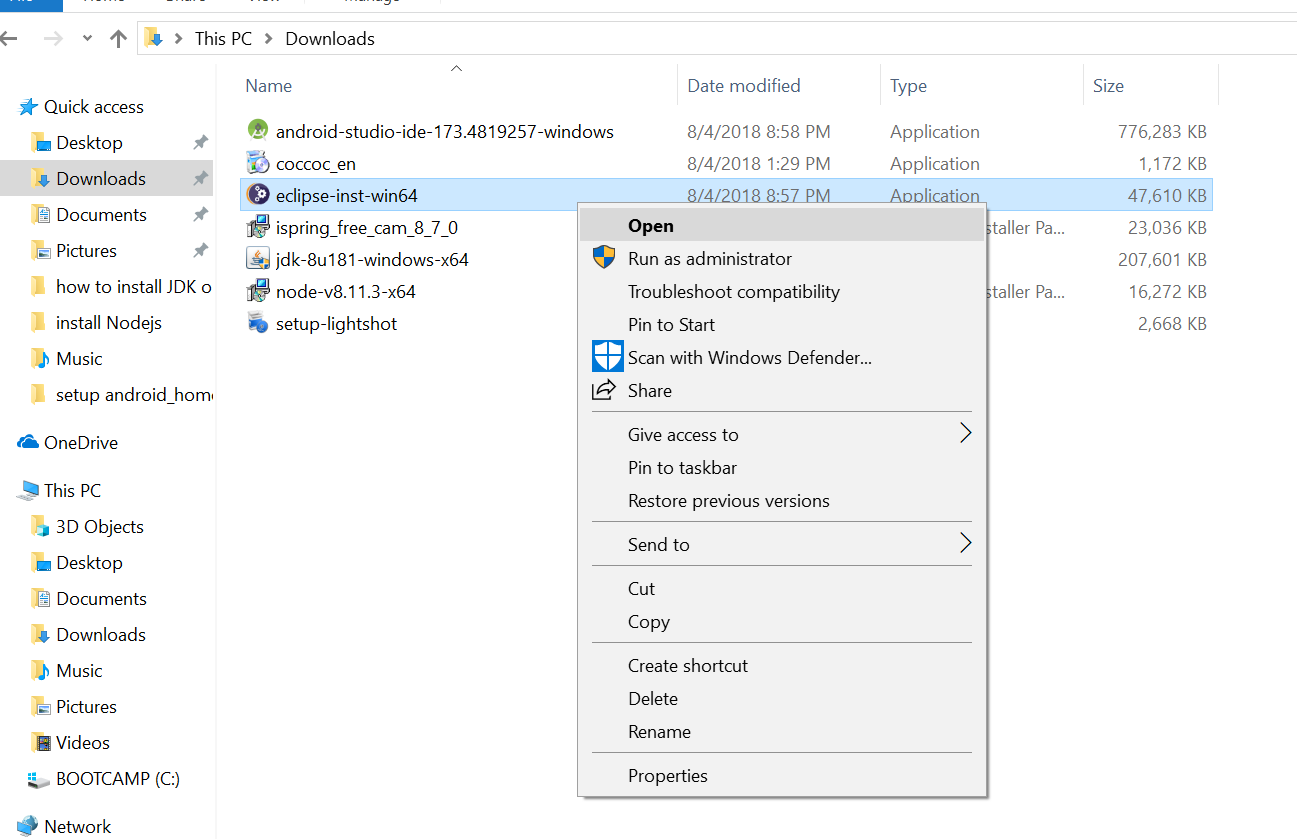
Open the downloaded file to start installation:

Screenshot_1


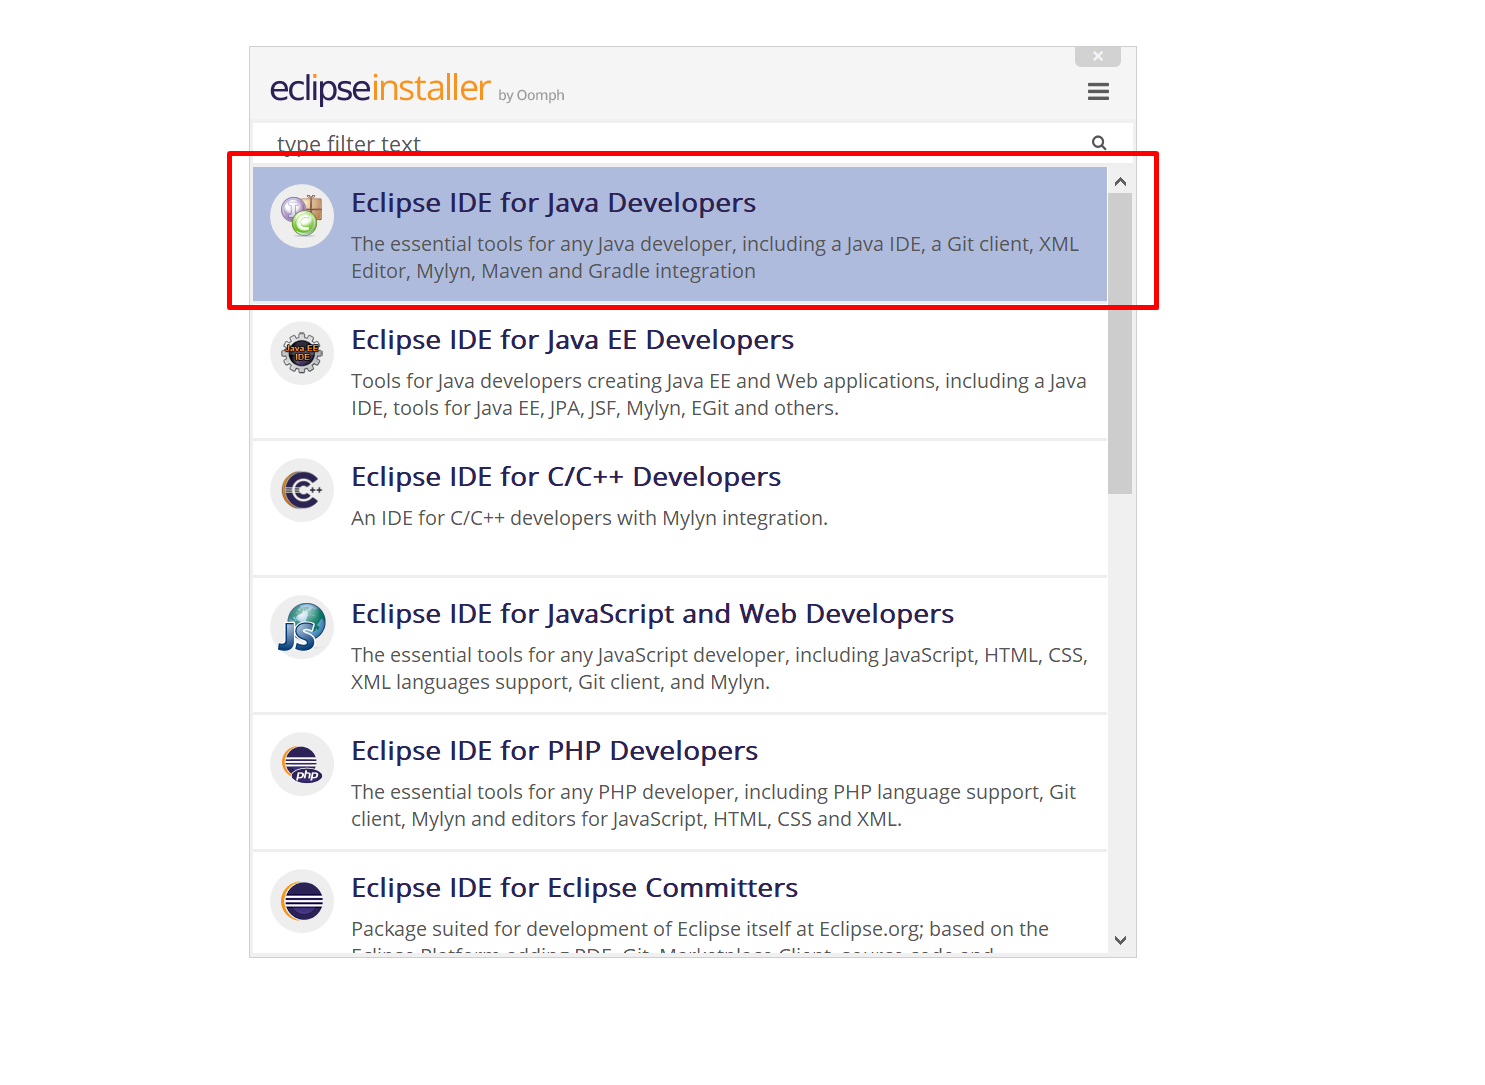
Choose IDE for Java Developer:

Screenshot_2

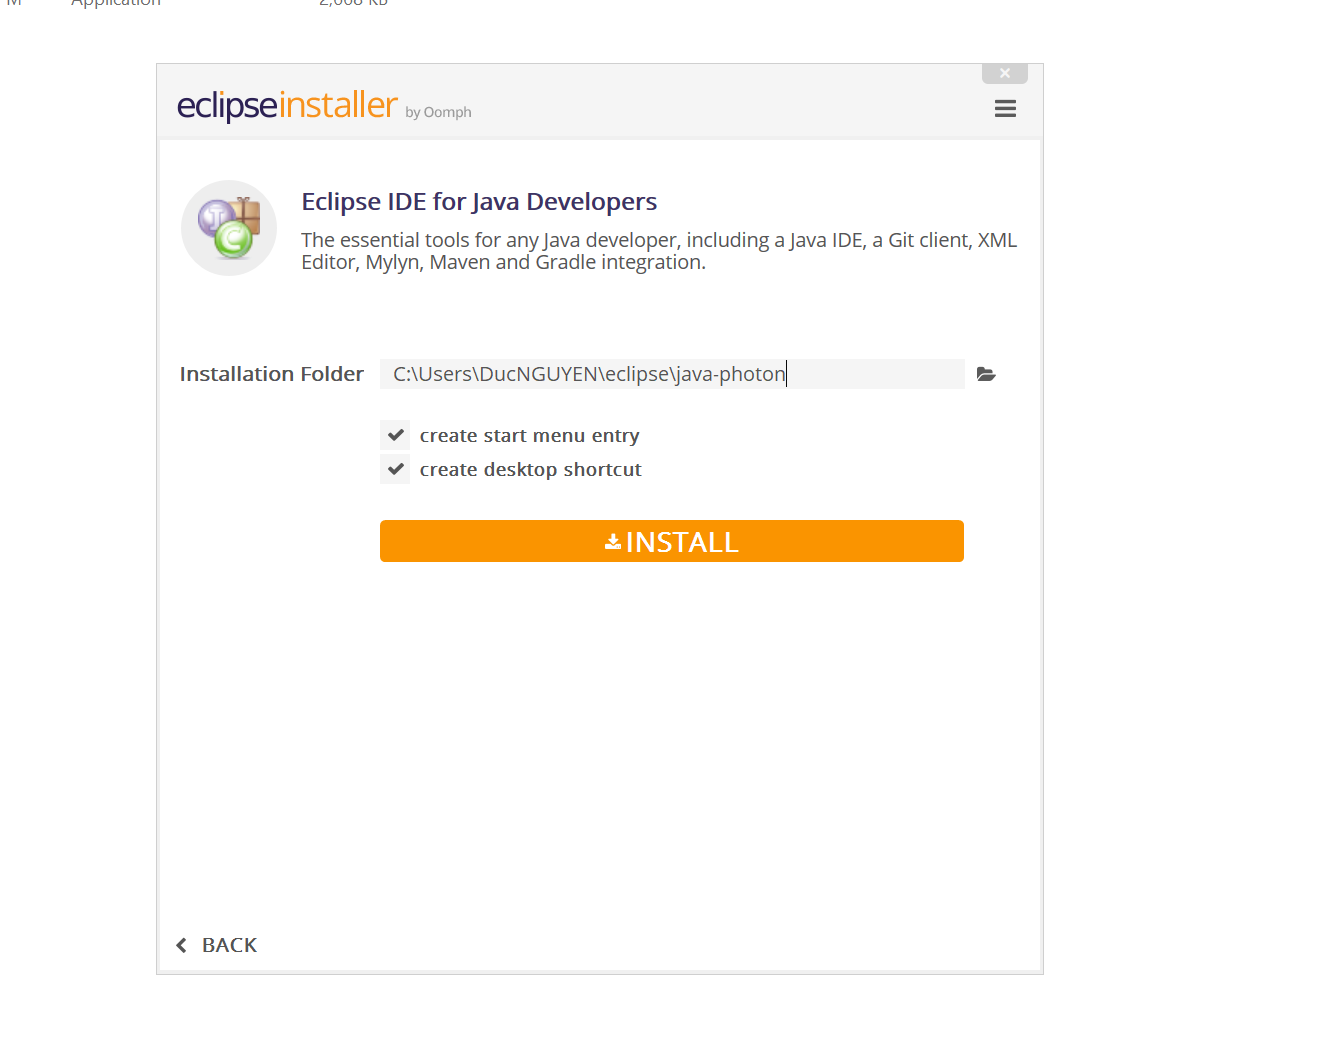
Choose a folder for installation, we will use default value here.

Screenshot_3

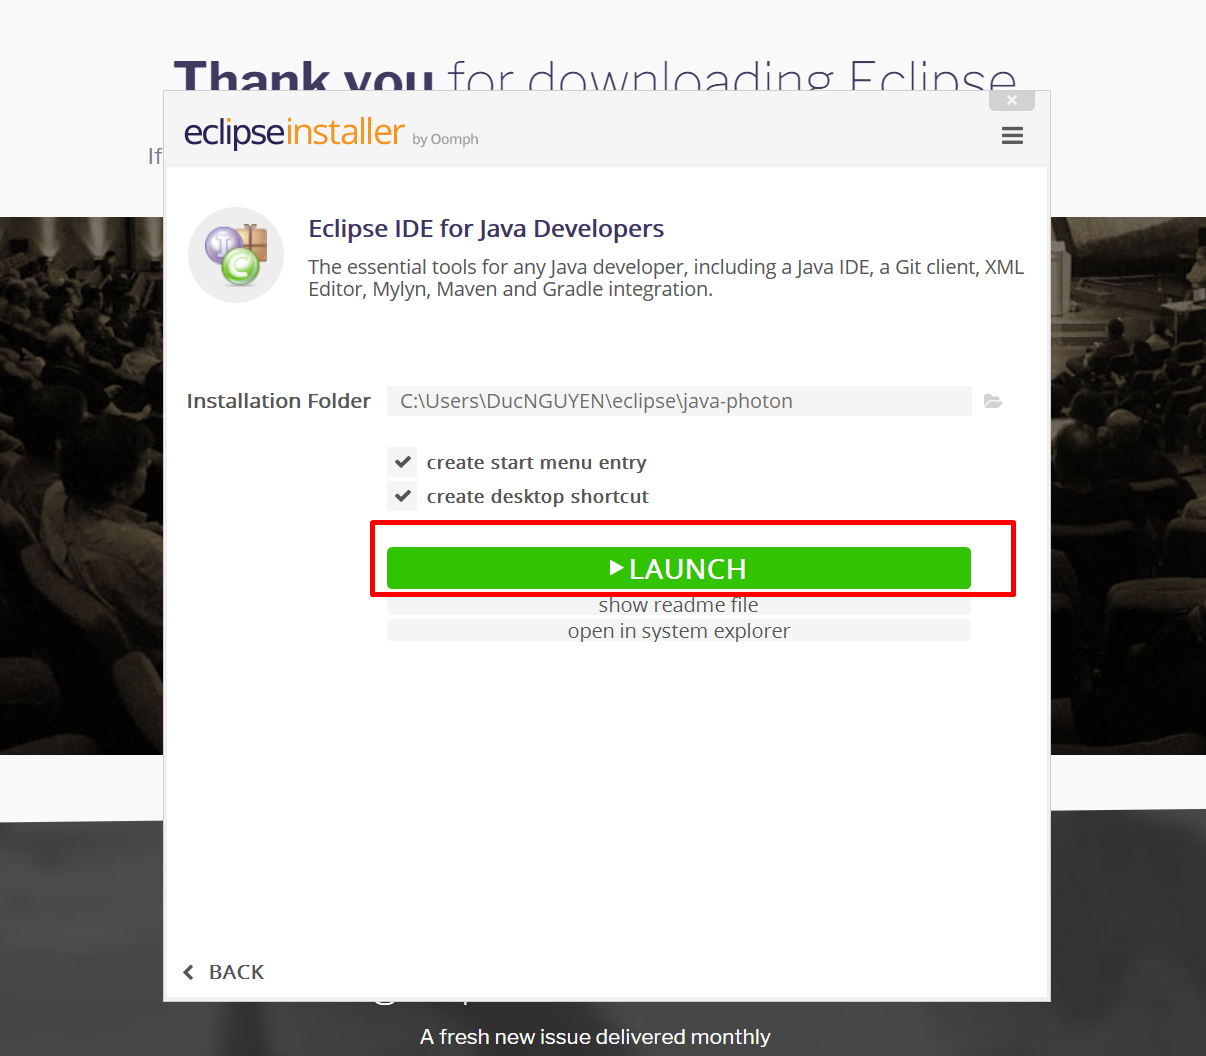
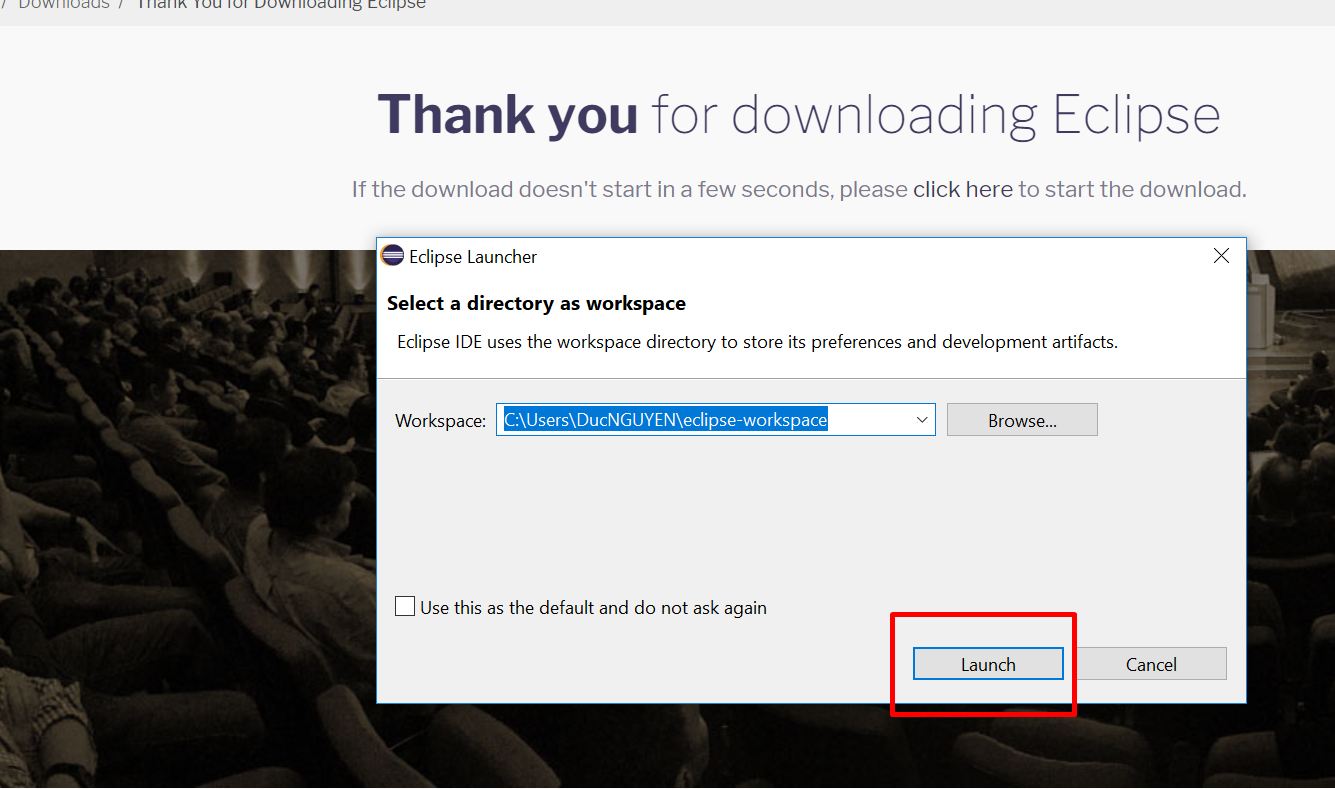
Click Next to install, after the installation finished, click Launch to launch Eclipse

launch

Choose workspace folder. You can use the default also.

Screenshot_4

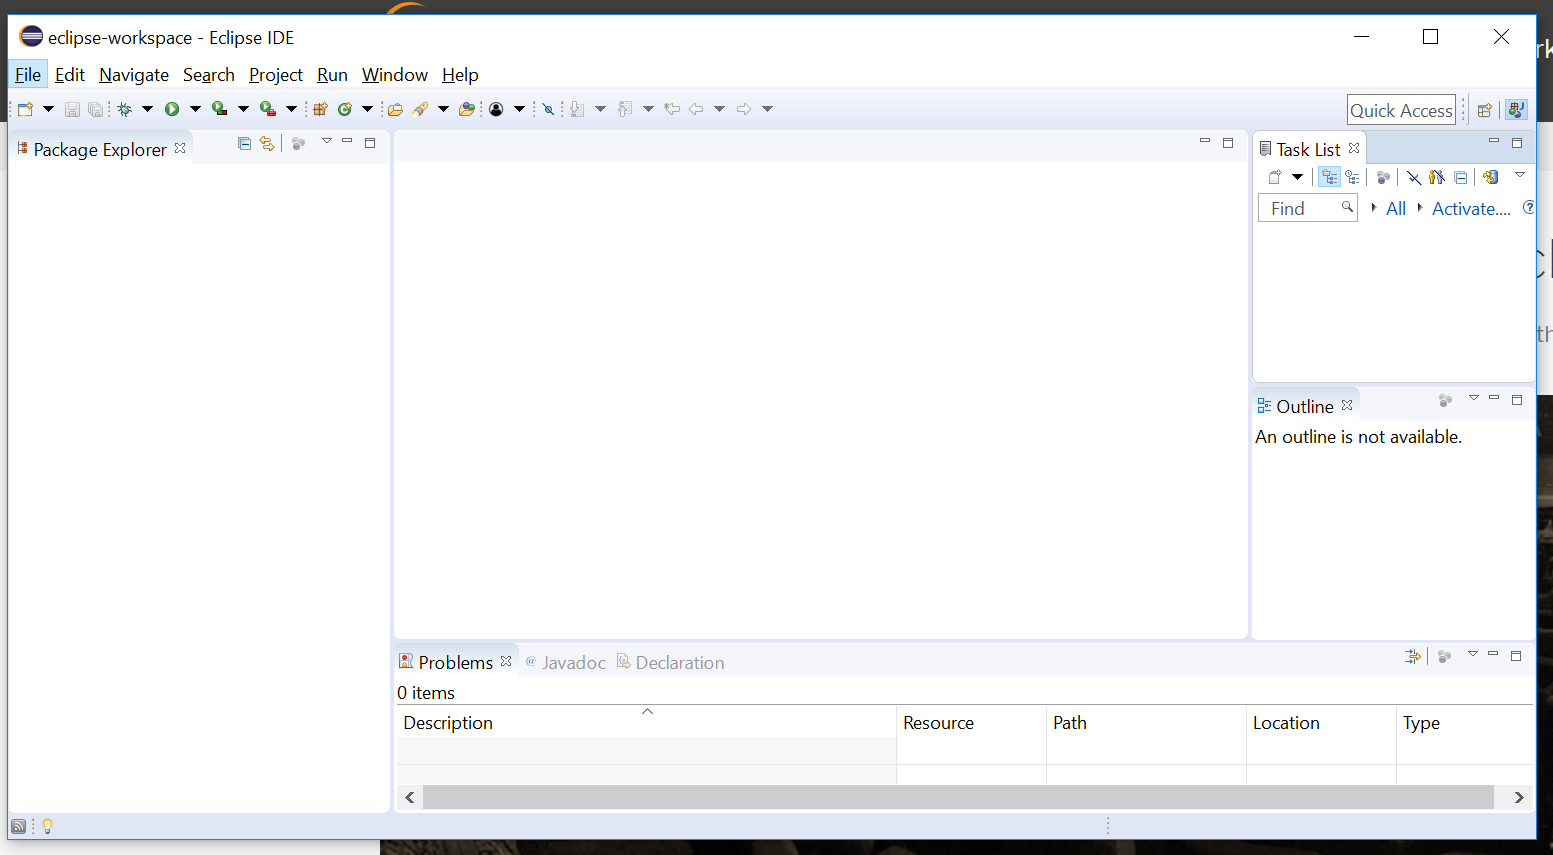
And here is your Eclipse.

Screenshot_5


Saturday, August 4, 2018

How to install JDK and setup JAVA_HOME in Windows 10

Step 1. Check if you already installed JDK or JAVA_HOME


Open Command Prompt by hit Window + R keys, type CMD
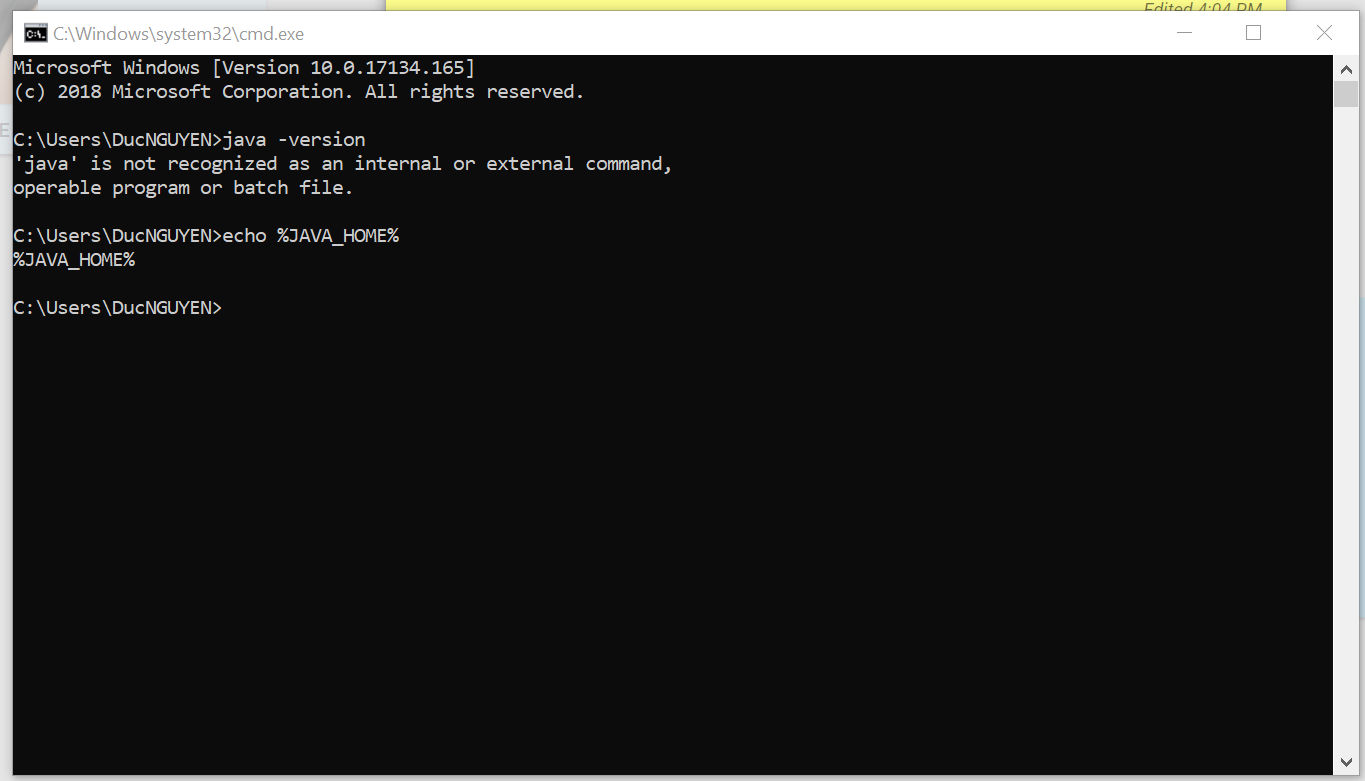
Screenshot_2
Java and JAVA_HOME were not setup

If you have a screen likes above, you are probably needed to install JDK and setup JAVA_HOME variable

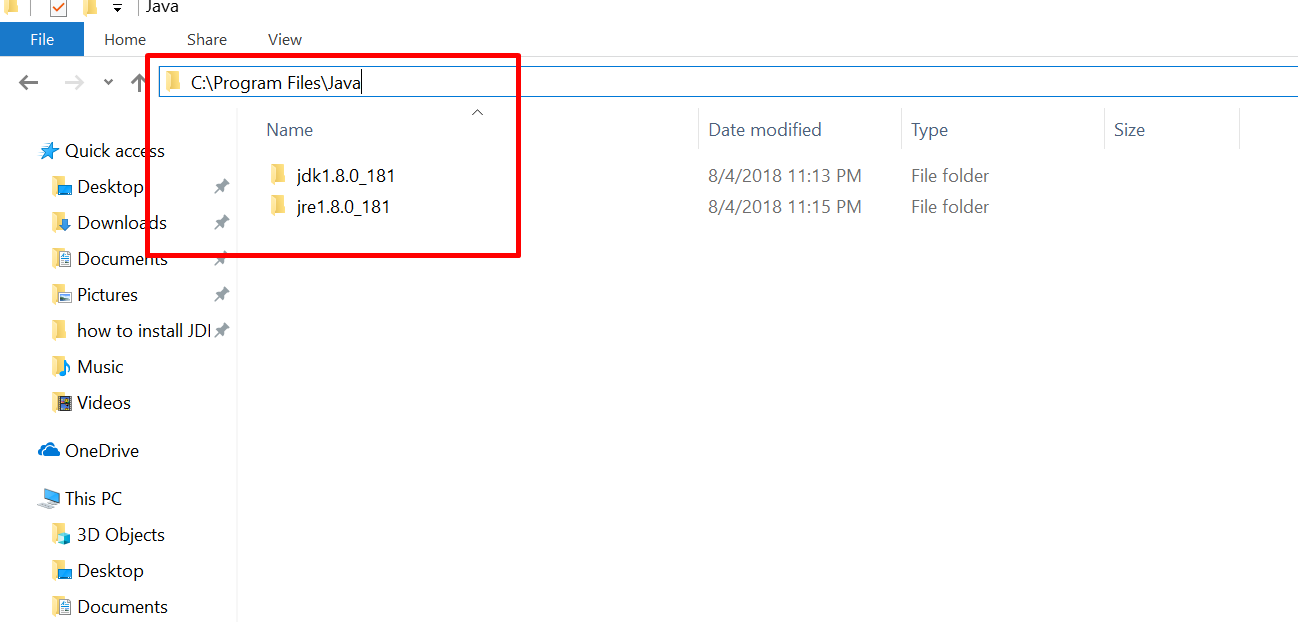
You can also check if you had installed by checking in explore

C:\Program Files\Java 

If you have a screenshot likes below, you can skip Step 2.

[caption id="attachment_200" align="alignnone" width="1298"]Screenshot_7 Installed JDK version 1.8.0.181[/caption]

Step 2.  Install JDK


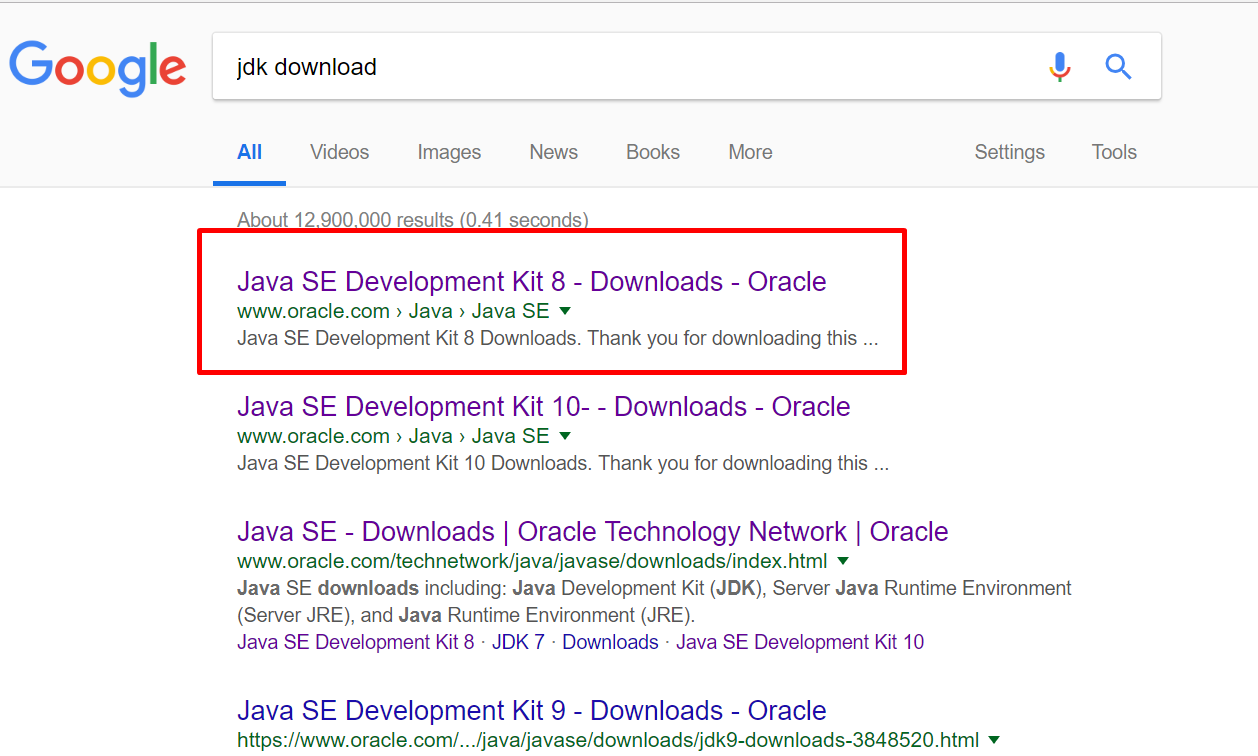
Open Google and search for "JDK download"

[caption id="attachment_194" align="alignnone" width="1258"]Screenshot_1 Choose URL with www.oralce.com[/caption]

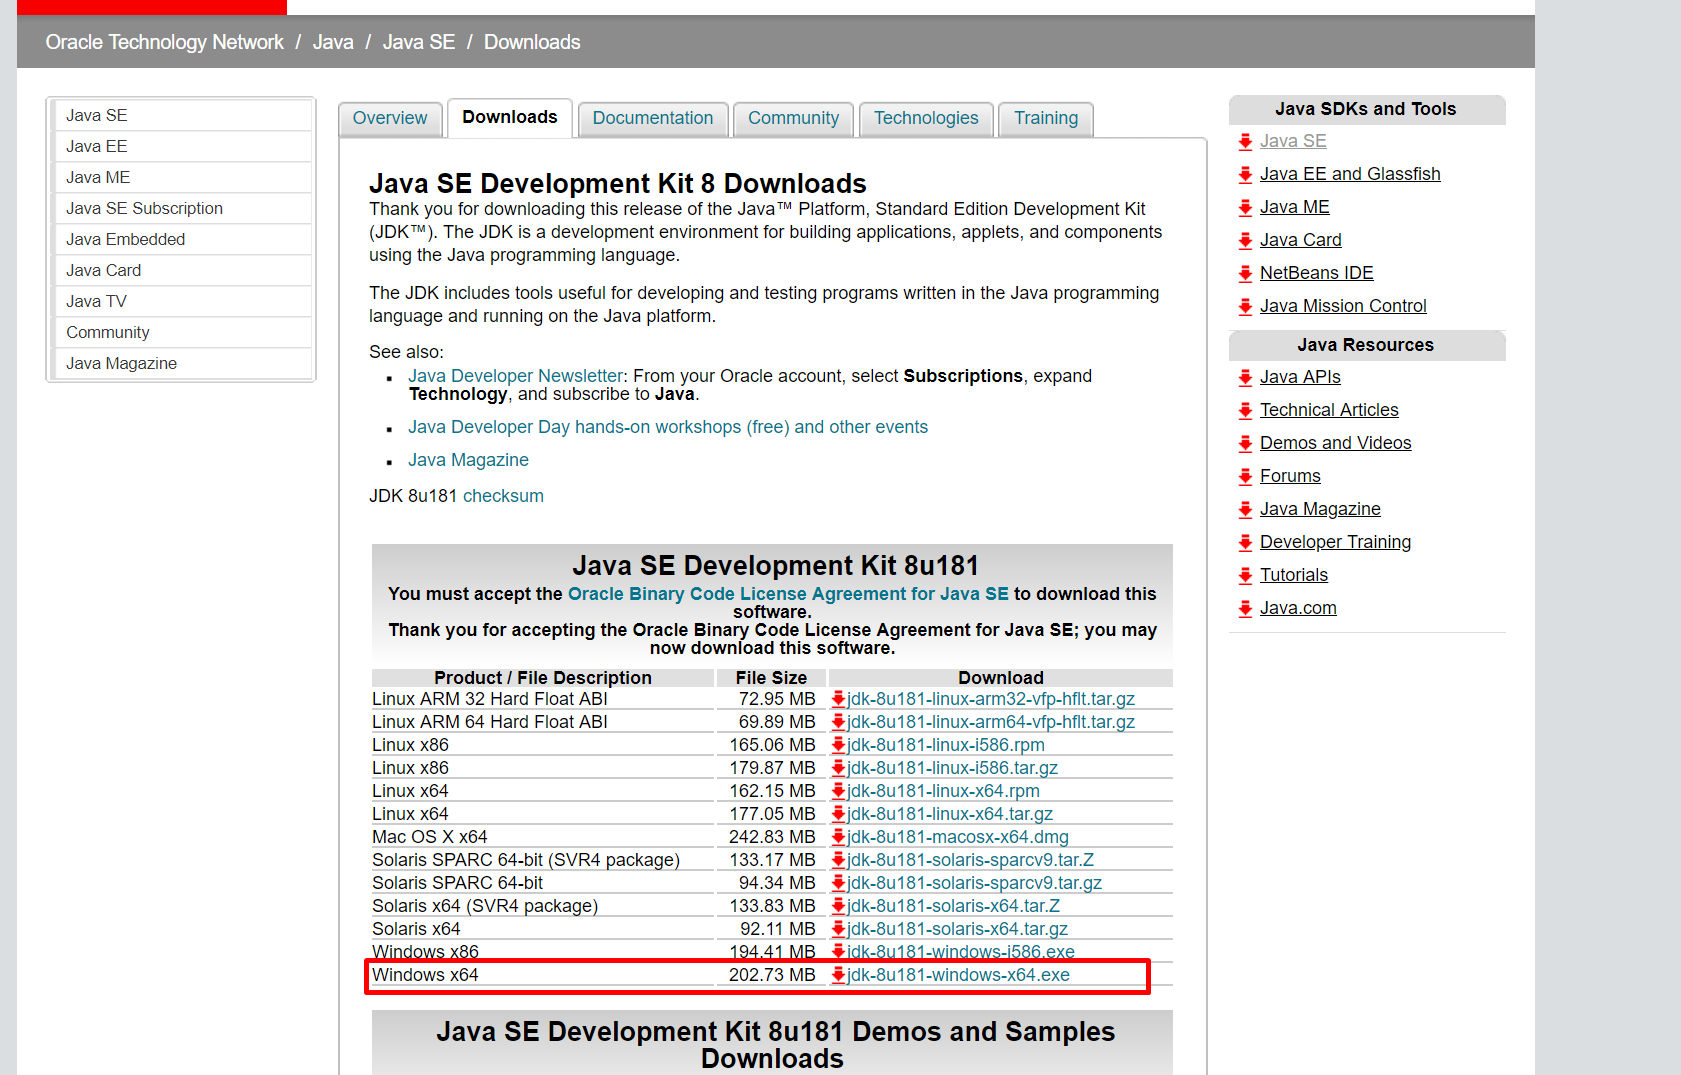
Download JDK 8 version, it is optional to choose JDK version, at the time of this article JDK 8 is best suitable for development

[caption id="attachment_197" align="alignnone" width="1681"]Screenshot_4 Choose JDK 8[/caption]

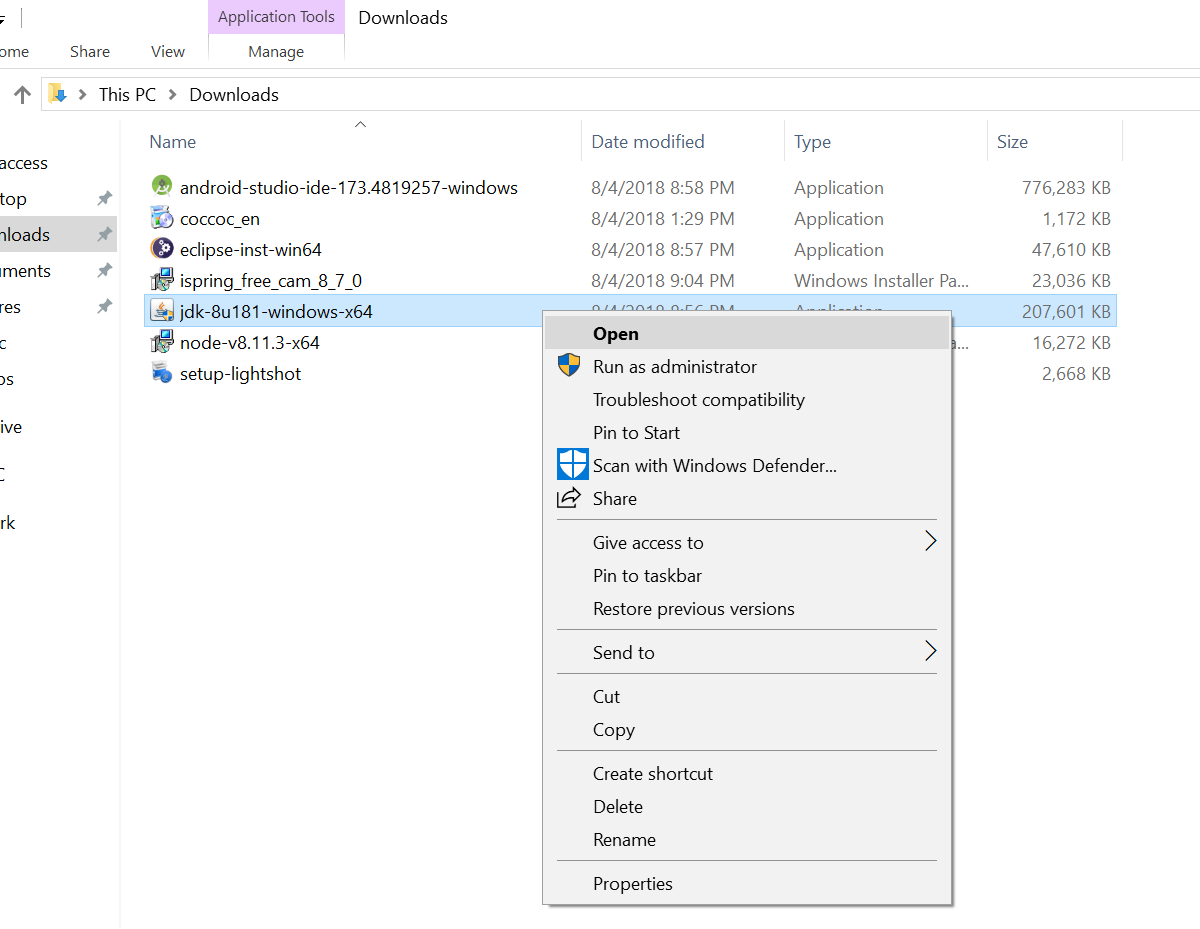
Install by click on downloaded JDK

[caption id="attachment_196" align="alignnone" width="1200"]Screenshot_3 Install the JDK after download finished[/caption]

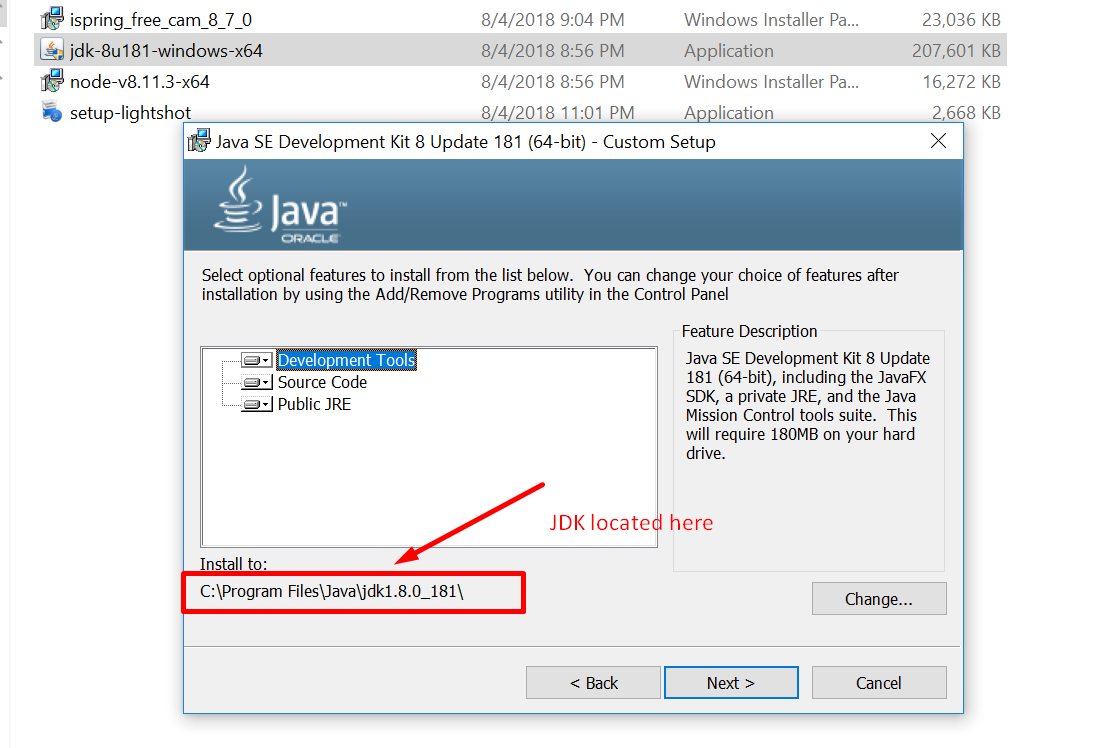
Noted the location of JDK

[caption id="attachment_198" align="alignnone" width="1103"]Screenshot_5 Note the location of JDK[/caption]

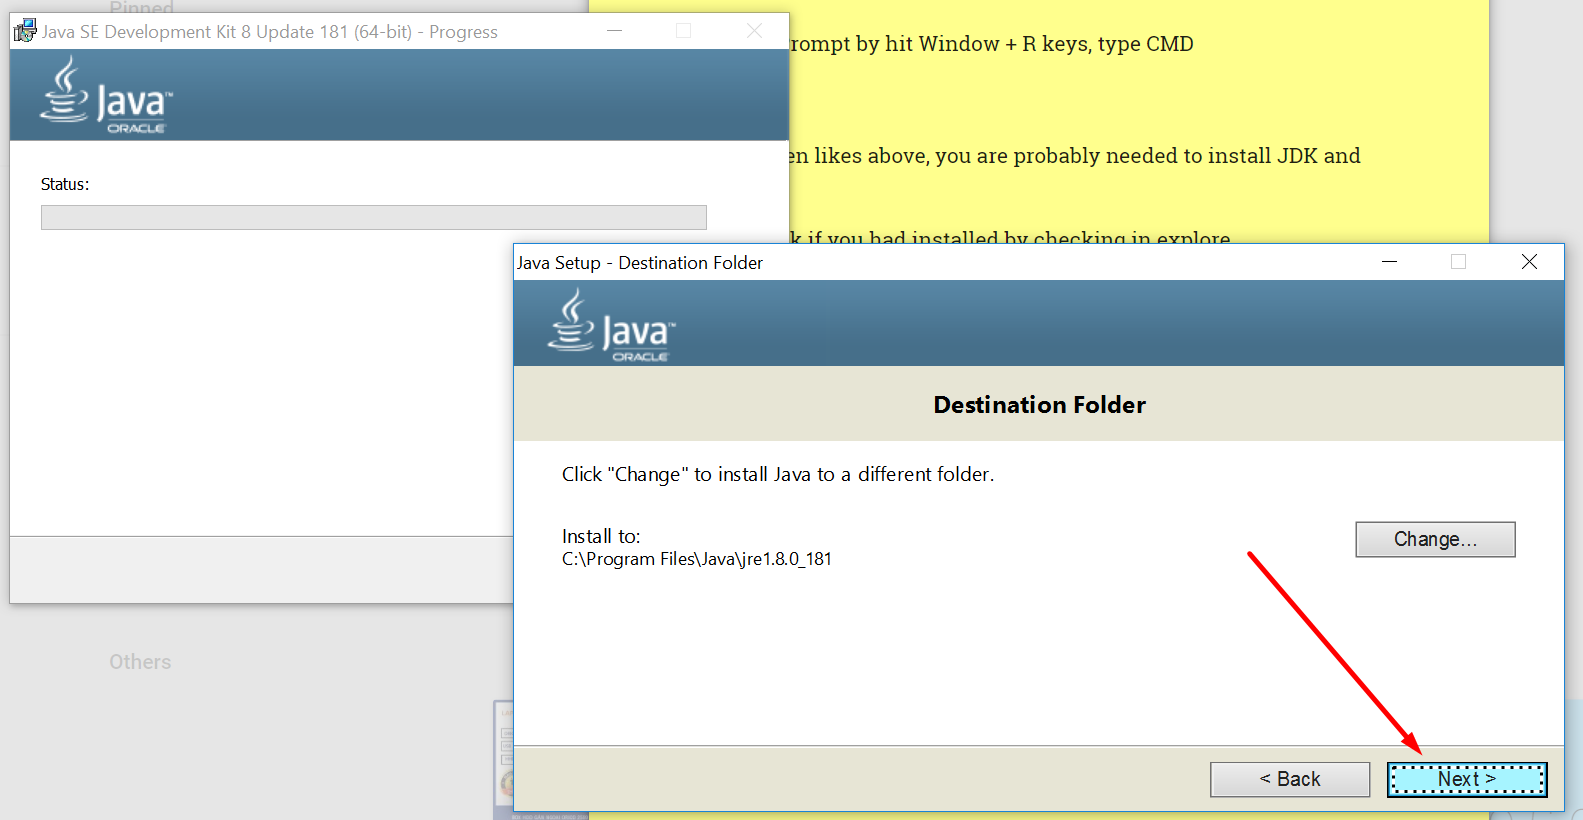
It may requires to install JRE, we will install the JRE also.

[caption id="attachment_199" align="alignnone" width="1583"]Screenshot_6 Install JRE also.[/caption]

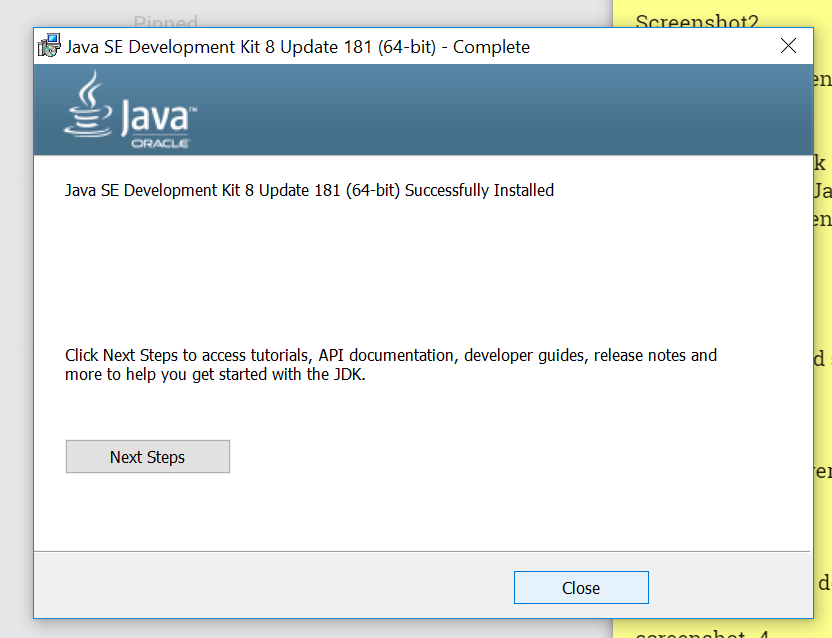
Installed successfully.

[caption id="attachment_201" align="alignnone" width="832"]Screenshot_8 Installed successfully[/caption]

3. Register java and JAVA_HOME to environment variables.


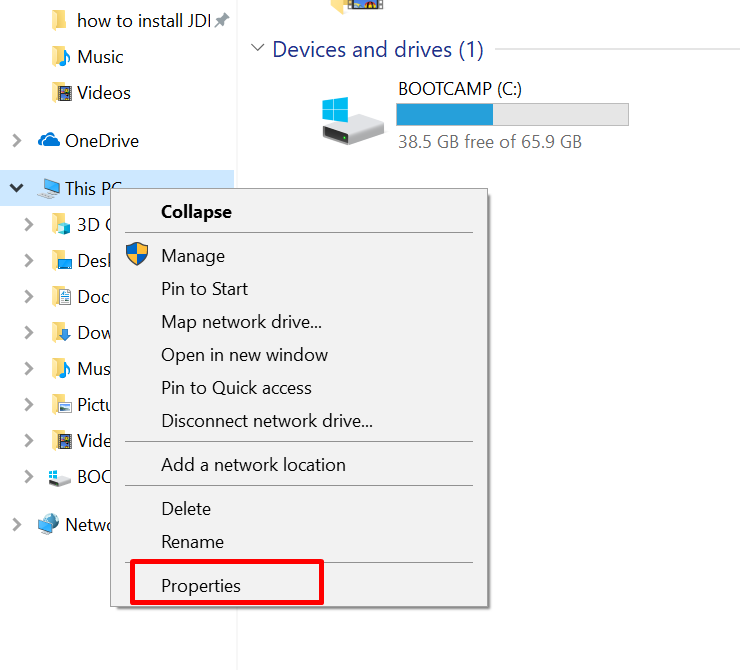
Open Explored, right click on This PC and choose Properties

[caption id="attachment_202" align="alignnone" width="740"]Screenshot_9 This PC --> Properties[/caption]

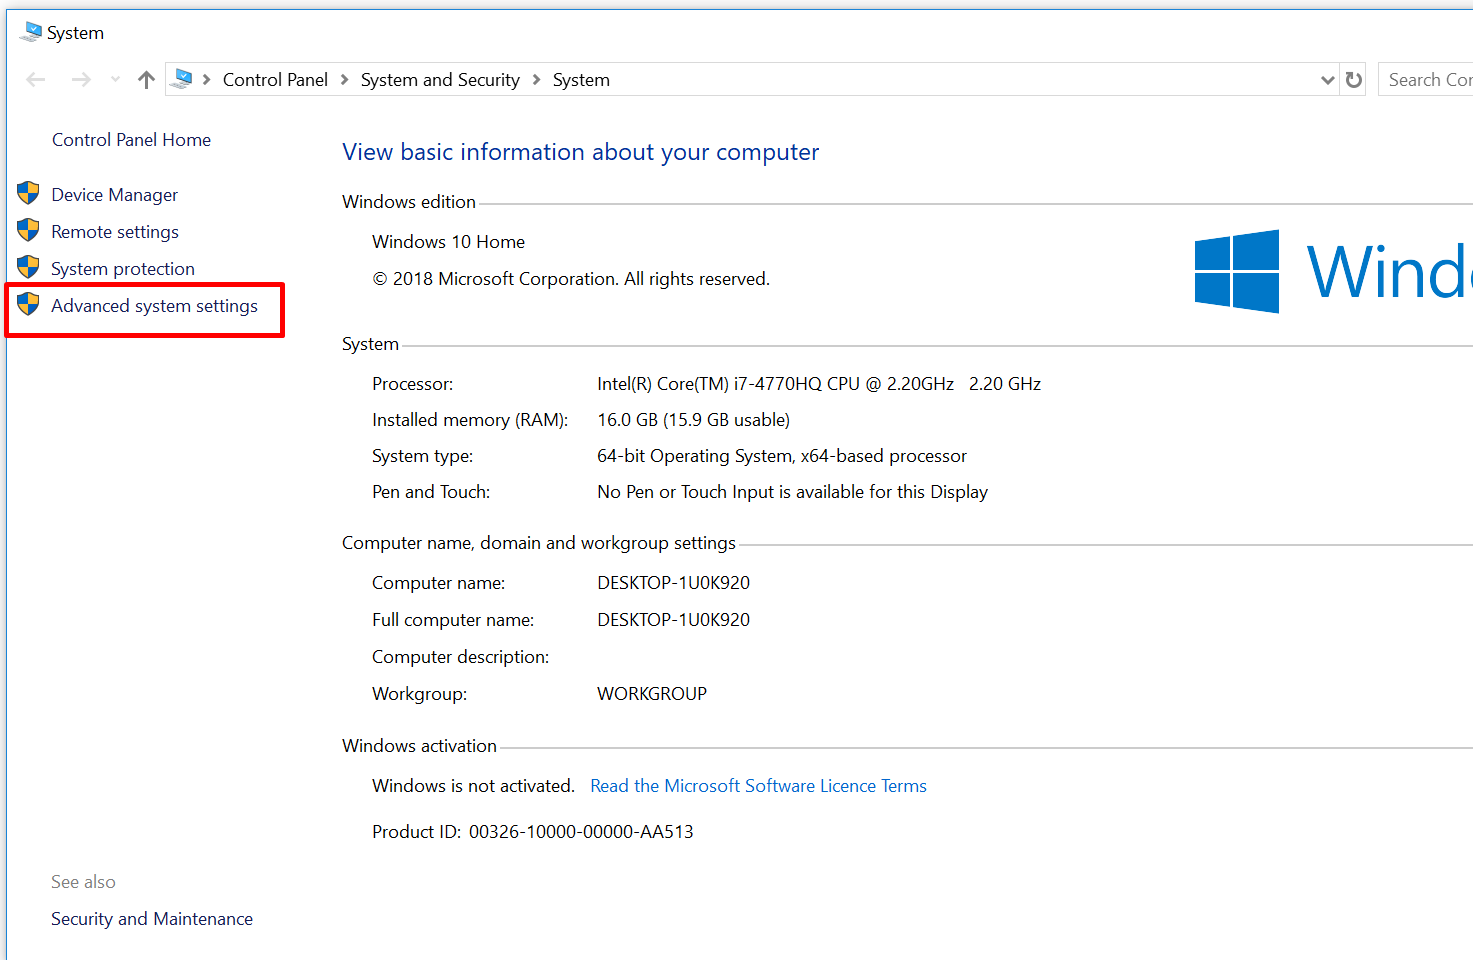
Choose Advance system sttings:

[caption id="attachment_203" align="alignnone" width="1473"]Screenshot_10 Advanced system settings[/caption]

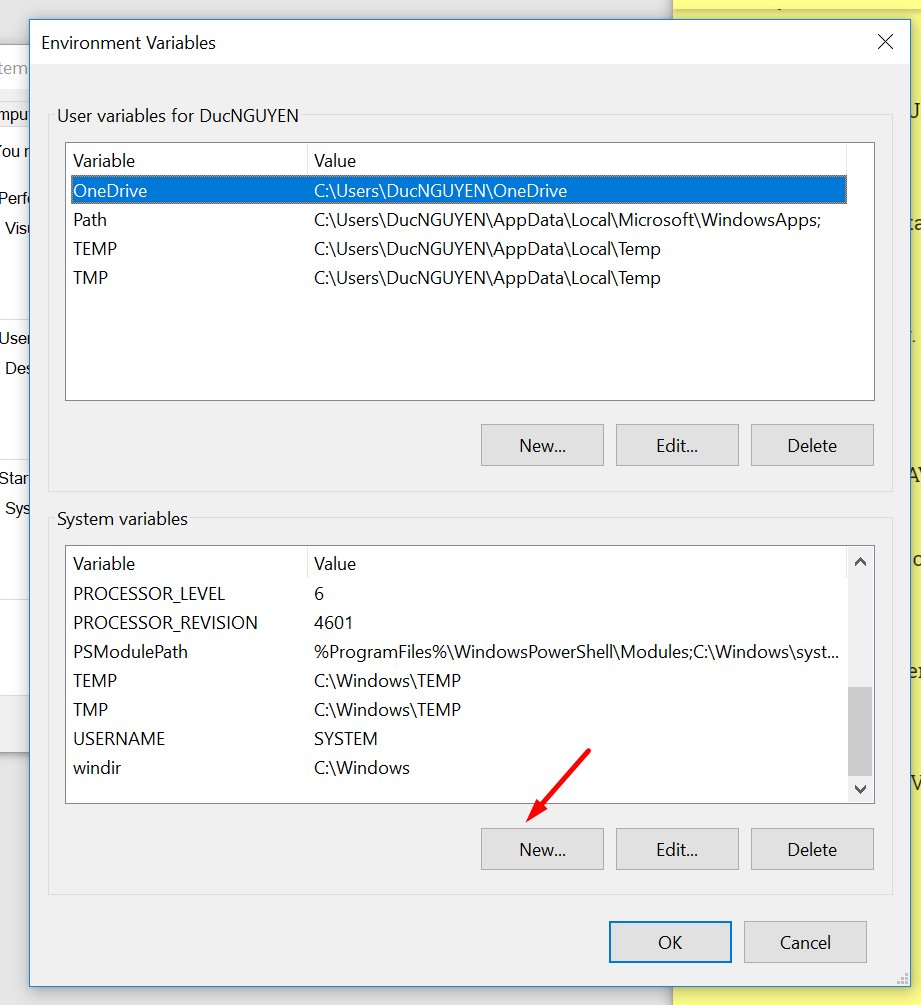
Choose Environment Variables
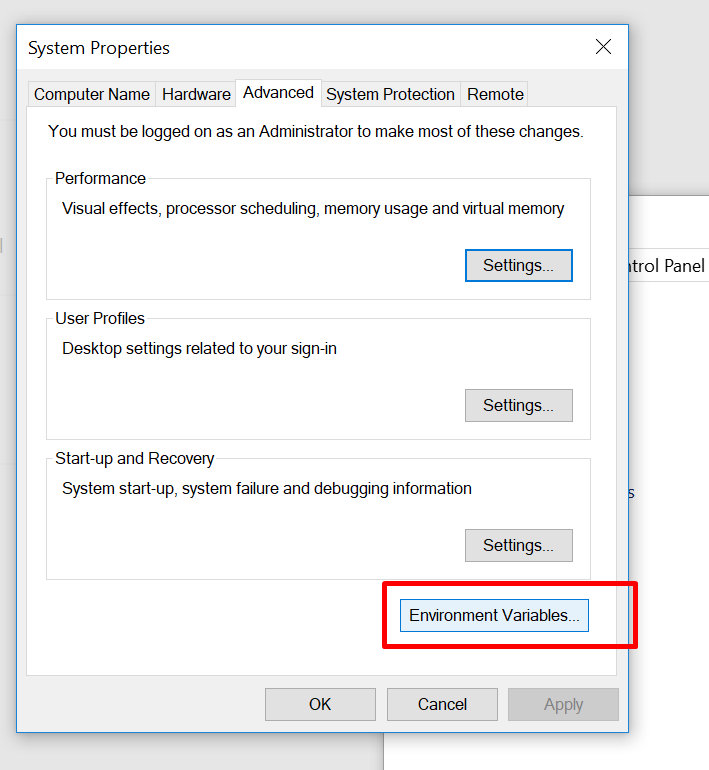
Screenshot_11

Now create new variable -

Screenshot_12

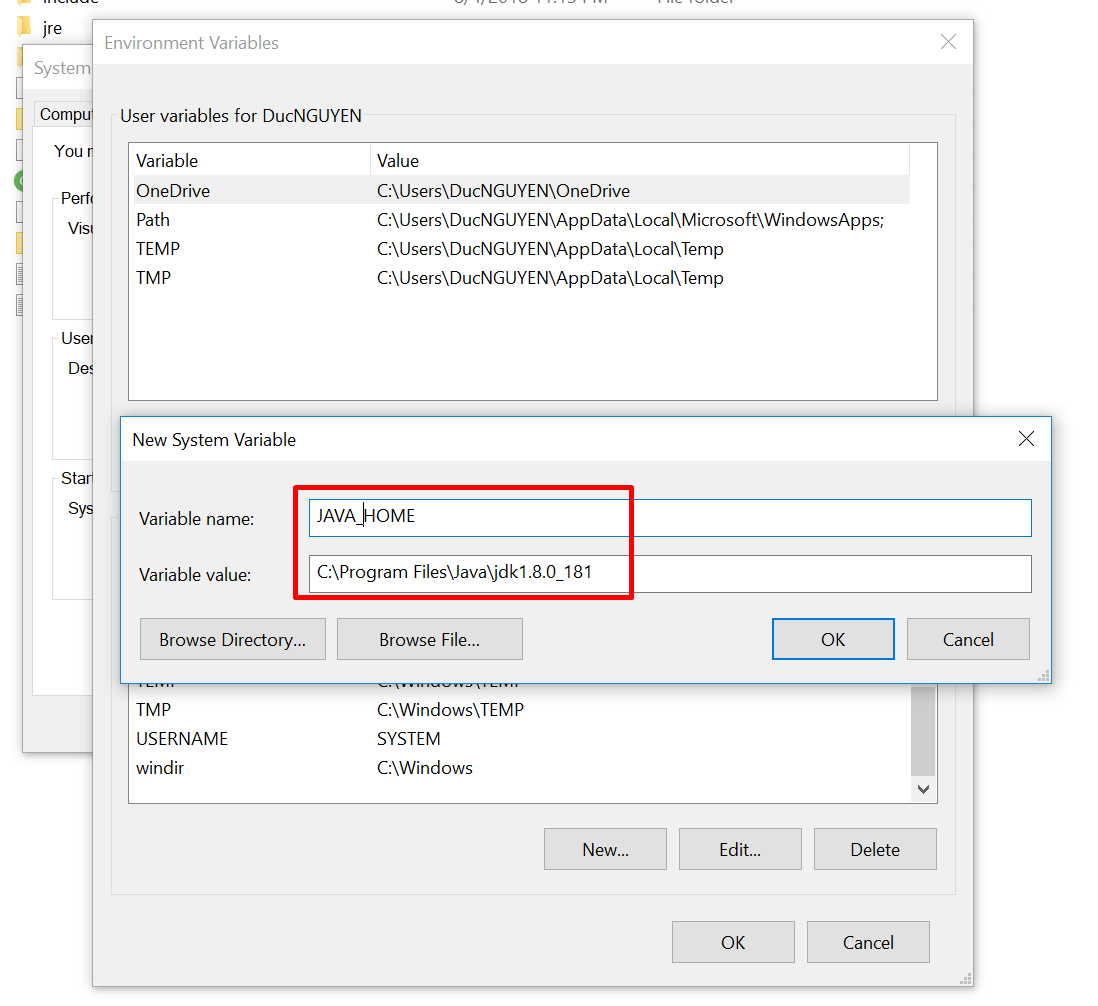
Add the JAVA_HOME variable with the value is JDK location in Step 2- C:\Program Files\Java\jdk1.8.0_181

[caption id="attachment_206" align="alignnone" width="1098"]Screenshot_13 Click OK to save the value[/caption]

Edit PATH variable to add java to PATH
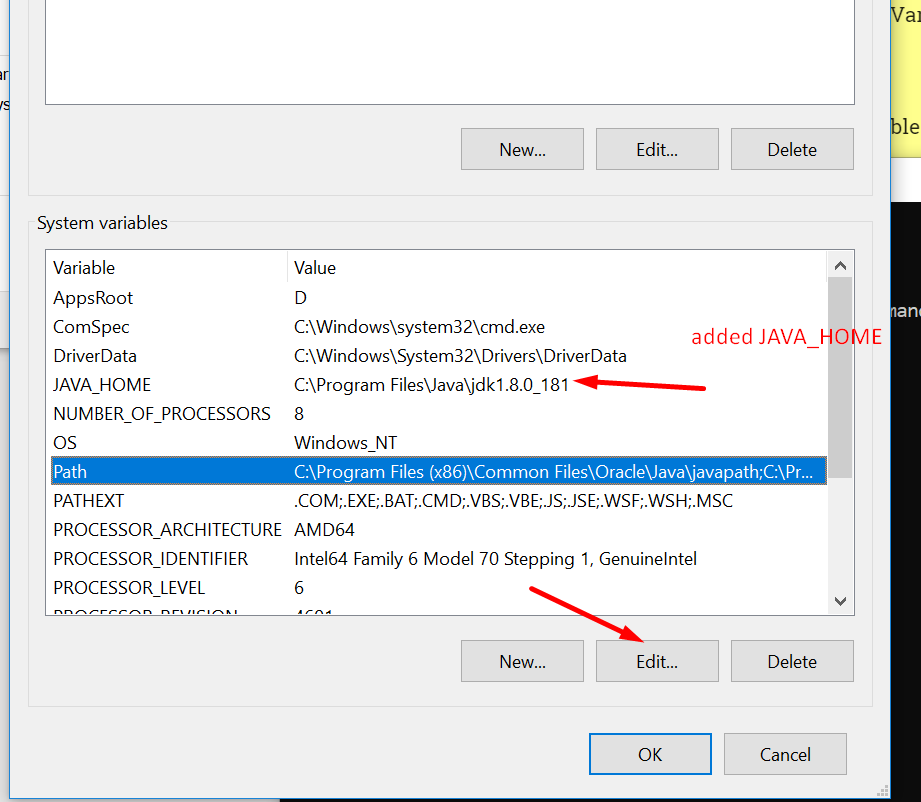
Screenshot_14 Choose Path and click Edit[/caption]

The screen depends on Window version, if you are in Window 10, You will have screen like below
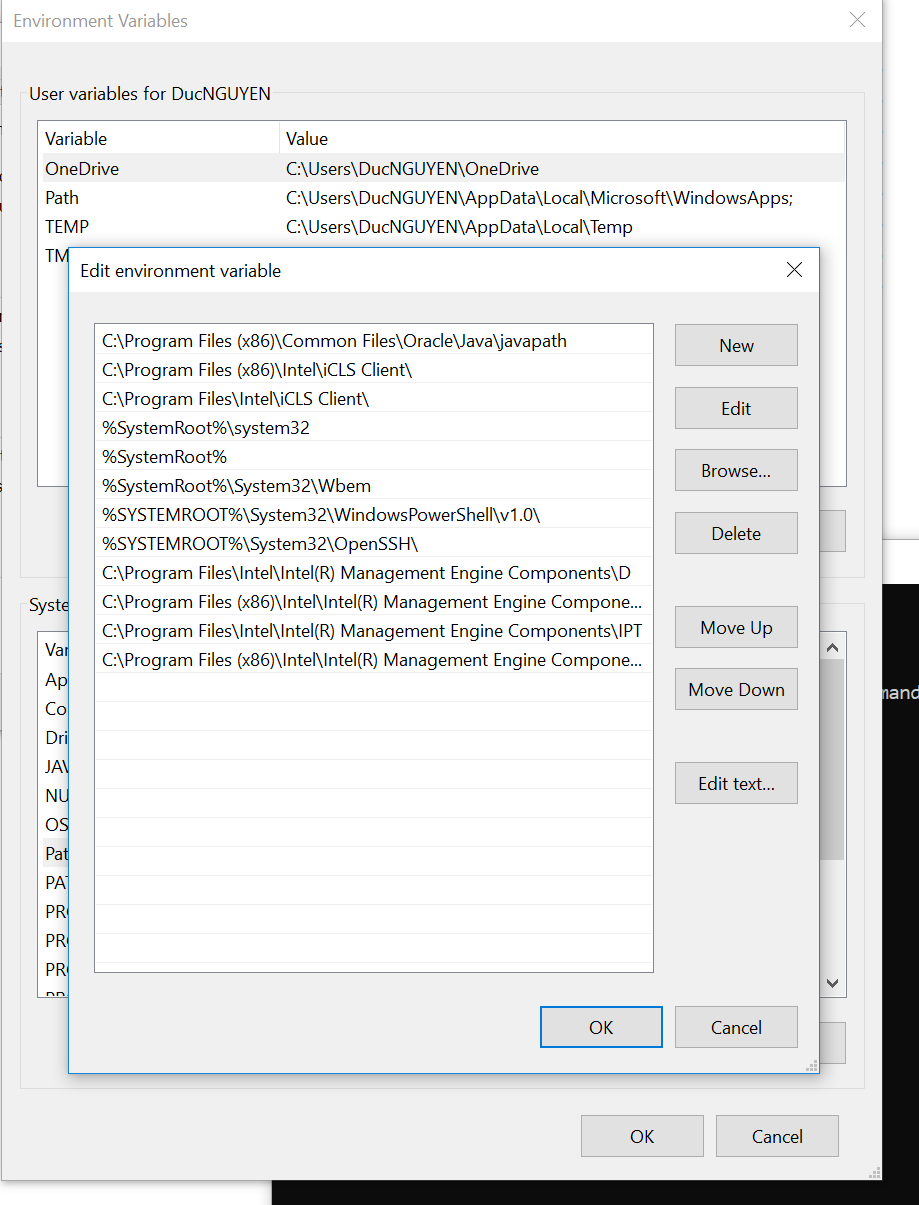
Screenshot_15 Click on New to add new Variable[/caption]

Click on new to add new value
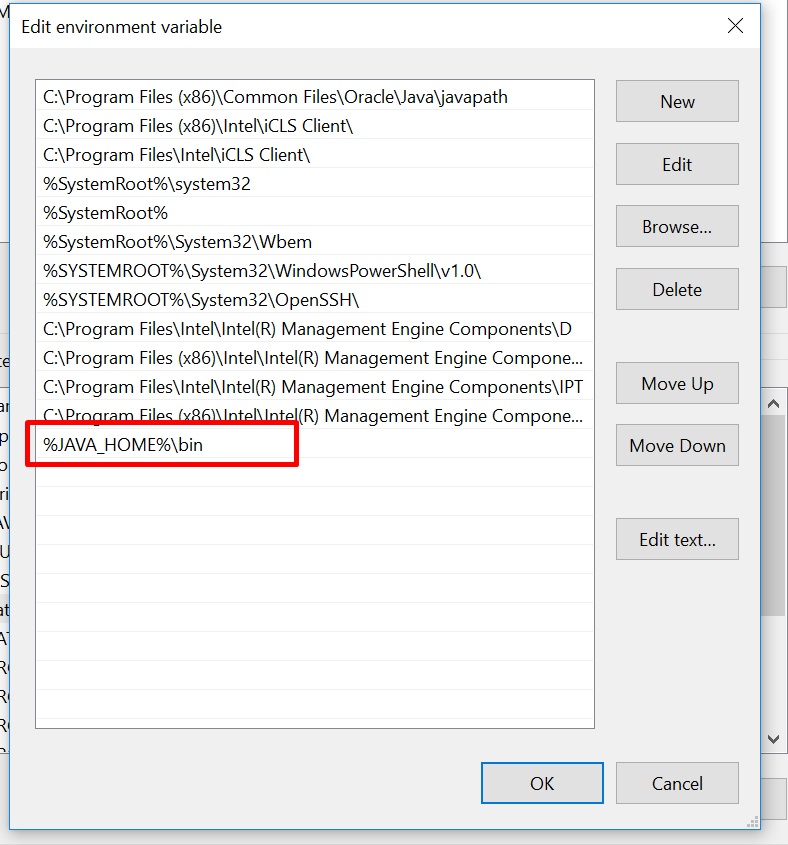
Screenshot_16
Click OK to save the value

Now save all the value by hit OK util we exist the Advance system testing screen.

4. Test the result


You should open a new Command Prompt to test the result

Hit Window + R , type CMD and hit Enter

type javac -version and echo %JAVA_HOME%
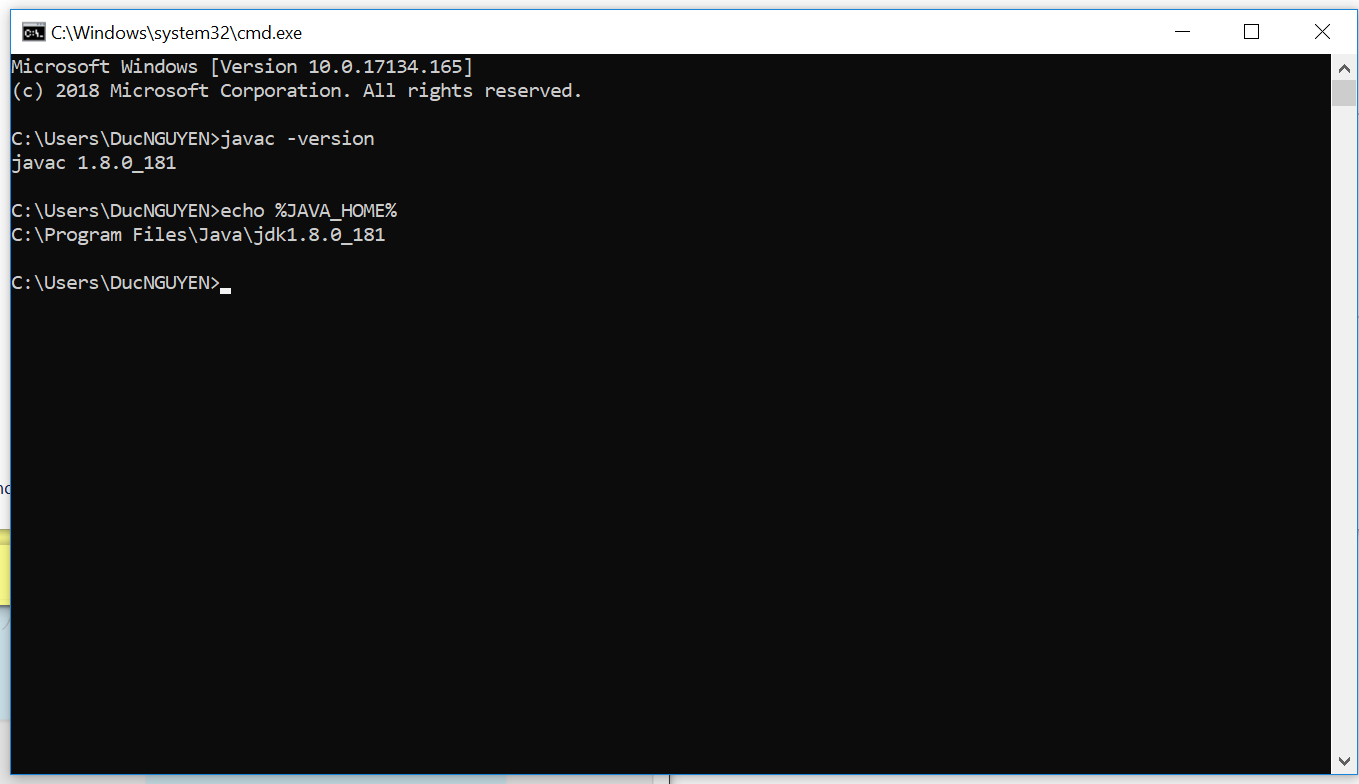
Screenshot_17

DONE.