Monday, January 21, 2019

When we need to use swap partition in Linux?

Recently i have an issue on my LightSail small instance which have 512MB of RAM,

I can not run react-script build on it

npm run build
Because of the issue: https://github.com/kitze/custom-react-scripts/blob/master/packages/react-scripts/template/README.md#npm-run-build-exits-too-early

So create a Linux swap is life saver.

Firstly, check if swap available :

sudo swapon --show
if it show nothing, then you don't have any swap yet.

Now, create a swap file, it should be 2x or 4x of your RAM capacity
sudo fallocate -l 1G /swapfile

To verify the swap is created
ls -lh /swapfile
To enable swap, you may need to change the permission

sudo chmod 600 /swapfile
make swap file
          sudo mkswap /swapfile        
then
sudo swapon /swapfile
check if it is ready
sudo swapon --show
 To enable swap permanent

Backup file
sudo cp /etc/fstab /etc/fstab.bak
Add the line at the end of file

/swapfile swap swap defaults 0 0

Sunday, January 6, 2019

Benchmarking web application tools


1. Apache benchmarking 

Home page https://httpd.apache.org/docs/2.4/programs/ab.html

  • c: ("Concurrency"). Indicates how many clients (people/users) will be hitting the site at the same time. While ab runs, there will be -c clients hitting the site. This is what actually decides the amount of stress your site will suffer during the benchmark.
  • n: Indicates how many requests are going to be made. This just decides the length of the benchmark. A high -n value with a -c value that your server can support is a good idea to ensure that things don't break under sustained stress: it's not the same to support stress for 5 seconds than for 5 hours.
  • k: This does the "KeepAlive" functionality browsers do by nature. You don't need to pass a value for -k as it it "boolean" (meaning: it indicates that you desire for your test to use the Keep Alive header from HTTP and sustain the connection). Since browsers do this and you're likely to want to simulate the stress and flow that your site will have from browsers, it is recommended you do a benchmark with this.
    The final argument is simply the host. By default it will hit http:// protocol if you don't specify it.
ab -k -c 350 -n 20000 example.com/ 

By issuing the command above, you will be hitting http://example.com/ with 350 simultaneous connections until 20 thousand requests are met. It will be done using the keep alive header.


E.g: Get user profile

ab -n2000 -c10 -k -m GET -T "application/json" -H "${accessToken}" http://localhost:8080/api/v1/users/profile


2. Apache Jmeter


Create many users using __UUID() random method example:


References:


Saturday, January 5, 2019

MacOS basic commands

1. Copy a folder into another folder


cp -r /path/folder/a /path/folder/b

result:
/path/folder/b
/path/folder/b/a

2. Move a folder into another folder


mv /path/folder/a /path/folder/b

result:
/path/folder/b
/path/folder/b/a

3. Remove files


rm -rf /path/to/file
rm -rf /path/to/file*

4. Process and ports


lsof -iTCP -sTCP:LISTEN -n -P
lsof -iTCP -sTCP:LISTEN -n -P | grep {PORT}

5. Kill a process


kill -9 ${PID}

6. Change owner of a folder


# for current user
sudo chown -R `id -un` /path/to/folder
# a user
sudo chown -R ${username} /path/to/folder

MongoDB basic commands

1. Setup MongoDB

  • Download: https://www.mongodb.com/download-center/community

  • Extract folder
    tar -zxvf mongodb-osx-x86_64-xx.tgz -C /path/to/container/folder

  • Add to $PATH
    Find out which current shell you are working on.
    zsh open ~/.zshrc
    bash open ~/.bashrc
    add lines at the end of the file.
    export MONGODB_HOME=~/Workspace/mongodb-osx-x86_64-xx/
    export PATH=$MONGODB_HOME/bin:$PATH

    Reload the environment variables for current shell
    # e.g
    source ~/.zshrc

  • Create the directory where MongoDB stores data
    sudo mkdir /data/db
    sudo chown -R `id -un` /data/db

  • Start MongoDB
    mongod

    For now , you have a mongodb server is running on default port 2017 without authentication, the data is stored on /data/db
2. Basic client commands

# connect to server
mongo

# list databases;
show databases;

# use a database
use ${db_name}

# list collections;
show collections;

# form now we can perform collection methods
db.${collectionName}.${command}

find({})
findOne()
find({"_id": new IdObject("${docId}")})
find({ <field>: { $regex: /pattern/, $options: '<options>' }})
deleteMany({})
deleteOne({})
remove({})
drop()

Checkout collection methods

2.Delete database

# from commandline
mongo ${dbName} --eval "db.dropDatabase()"

# inside mongoClient
use ${dbName}
db.dropDatabase()


Wednesday, December 5, 2018

How to deploy NodeJS ReactJS to AWS EC2

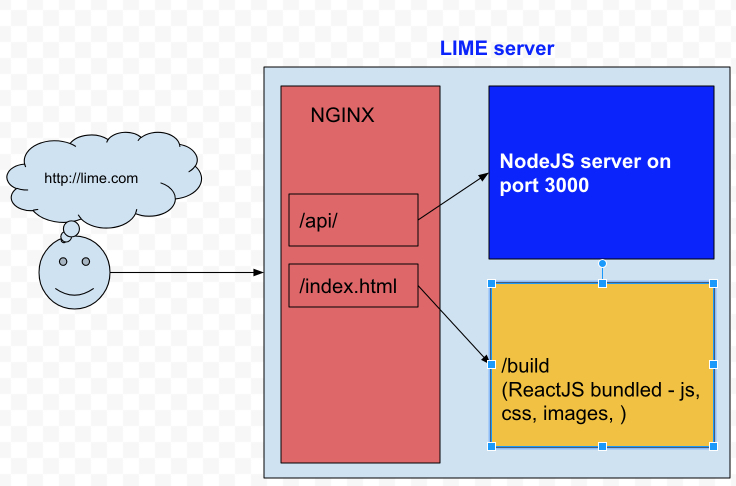
I am working on a web application, which BackEnd is in NodeJS, FrontEnd is ReactJS Single Page Web Application.

I want to deploy the application on AWS EC2, Here is how I did it.
2018-12-05-00-19-12
Client - Server overview

 NodeJS

node version : v10.13.0

npm version : 6.4.1

BackEnd application runs on port 3000

I use PM2 for  process manager for Node.Js http://pm2.keymetrics.io/

ReactJS

React-scripts : 2.1.1 is ReactJS development tool, also help us to bundle javascript, css, images... into a build folder.

NGINX

Version : nginx version: nginx/1.14.0 (Ubuntu) , to find ngnix version
Change  nginx default file: /etc/nginx/sites-enabled/default

1. Add proxy pass for API
location ~ ^/api/ {
   proxy_pass      http://127.0.0.1:3000;
}

to pass all API requests to NodeJS server.

2. Add root static folder
root /home/ubuntu/public_html/lime-fe/build;

To point default static folder to the build folder of react-script.

3. Also it is important to have

location / {
    try_files $uri /index.html;
}
4. Reload nginx sever:
 
# systemctl restart nginx
OR
# sudo systemctl restart nginx
5. Additional setups: - Remove nginx version
server_tokens off;
- Enable Gzip
        ##
        # Gzip Settings
        ##

        gzip on;
        gzip_disable "msie6";

        # gzip_vary on;
        # gzip_proxied any;
        # gzip_comp_level 6;
        # gzip_buffers 16 8k;
        # gzip_http_version 1.1;
        gzip_types text/plain text/css application/json application/javascript text/xml application/xml application/xml+rss text/javascript;


to let reactJS application handles the routing (URLs) instead of nginx.

Full configuration file.


Setup environment variables

~/.bash_profile

Some variables :

export NODE_ENV=production

To reload bash environment, using the command

source ~/.bash_profile

OR
. ~/.bash_profile

Some notes:

1. npm install without devDependencies:

If server setup with production mode on

NODE_ENV=production

, NPM install will ignore devDependencies

We can use npm install --only=dev or set NPM production.

to check if npm is in production mode , we can use the command:

npm config get production

To turn off production mode:

npm config set -g production false

2. pm2 doesn’t reload environment variables:

we need to use --update-env ,
e.g:
 pm2 reload sever --update-env

References

  1. How to install NodeJS and NPM : https://github.com/nodesource/distributions/blob/master/README.md

  2. How to install
    https://www.digitalocean.com/community/tutorials/how-to-install-nginx-on-ubuntu-16-04

  3. How to check Ubuntu version: https://askubuntu.com/questions/686239/how-do-i-check-the-version-of-ubuntu-i-am-running

  4. How to install MongoDB on Ubuntu: https://docs.mongodb.com/v3.2/administration/install-on-linux/

Monday, November 12, 2018

Spring Boot - Modularizing project into modules and re-use

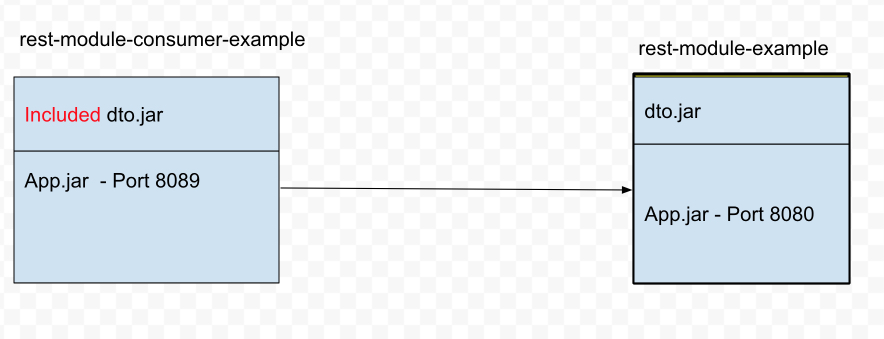
While working with microservices, there will be many small modules in your systems, they calls each others, for me it would be great if we can share at least the data transfer classes. It will save time on development

Here is the structure of my example

rest-module-example

In the example, I created a rest-module-example module, it is the main module which separated into 2 modules ( dto.jar and app.jar )

The rest-module-consumer-example will include the dto.jar ( by Maven or Gradle ) , so It will be easy to consume the REST API

You can find details implementation in the repos below:

rest-module-example: https://github.com/vanduc1102/spring-boot-examples/tree/master/module-rest-example

rest-module-consumer-example: https://github.com/vanduc1102/spring-boot-examples/tree/master/module-rest-consumer-example

Monday, November 5, 2018

Spring Boot override Bootstrap properties

1. Bootstrap properties file is inside the packaged jar


This is not a useful case to manage the bootstrap properties or application properties, the reason is you have to rebuild your application again if made any change to the properties

You should have properties file name following the format bootstrap-{profile}.yml ( or .properties variants)


2. Bootstrap properties is outside of the packaged jar.


I prefer this case to manage properties, we don’t need to rebuild the application again if we made change to properties also we can manage our properties better with VCS like git.

Let assume that we have a configuration file outside of packaged jar.

In order to load the file, we need to change the bootstrap properties location by override the spring.cloud.bootstrap.location attribute.


With this approach we can easily override the bootstrap properties.